Rough Z-Axis Adjustment
Over time a tiny amount of abrasive can make its way into the z-axis adjustment block and make it difficult and rough to set the z height of the Nozzle. The following guide will walk you through dissembling and cleaning the assembly.
Tools Needed
4 mm Allen Key
17 Wrench or socket
Torque Wrench with 17 mm Socket
Clean Rags
Compressed air if available.
Procedure
1. Remove the Abrasive hose, Touch off tool, and Z Adjustment knob.
2. Use the 4 mm Allen key to remove the Nozzle assembly from the Z-block.
3. Use a set of pliers to hold the mixing chamber while loosening the banjo bolt with a 17 mm wrench or socket.
[NOTICE] This step expose the internal of cutting head/nozzle assembly to the outside. Dust or debris is detrimental to the cutting head/nozzle assembly, thus cleanness is paramount in this steps and all steps below. Use tape to plug to block the top port of cutting head/nozzle assembly if possible.
4. Tape up the washers and the end of the banjo bolt to keep debris from getting into the hp system
5. Pull the bellow off the top of the Nozzle assembly to expose the snap ring.
6. Using the pliers to pull out the snap ring. Safety glasses are recommended as the ring and come flying off if you aren't careful. If you are having trouble try getting setup exactly as in the picture, with on side of pliers rest on the connecting rod, and the other side pushes the ring out. The ring should pop off with only minimal force
7. Remove the adjusting block and bellows from the guide rod.
8. Wipe down the guide rod using the clean rag.
9. Pull the Z Bellows off of the adjusting block
10. Using compressed air, blast out any any abrasive clinging to to the inside of the block. Always wear safety glasses when using compressed air. Alternatively you can use a clean rag to remove abrasive from all surfaces.
11. Using compressed air, blast out any any abrasive clinging to to the inside of the bellows. Alternatively you can try to wipe out any abrasive.
12. Re-install the lower bellow. Pull the bottom lip over the retaining ring groove
13. Install the adjustment block take note to match the orientation of the bellow ( round to round and flat to flat)
14 Install the top bellow the same way and push everything down
15. Install the snap ring using pliers. It should go on easily.
16. Lift the top part of the bellow over the snap ring. Once secured pull down the bellow to make sure it is correctly seated.
17. Remove all tools from the cutting bed, turn on water supply into the tank, turn on WAZER. Conduct a “HP valve“ check, and use the incoming low pressure water to wash the banjo assembly.
17 Re-install the banjo bolt using the torque wrench and pliers. The Torque should be 17 Nm. Also take care that the hose orientation relative to the abrasive inlet on the mixing chamber. When the abrasive inlet is point to the left, the high pressures must points to the back.
18. Install the nozzle back onto the Z-block using the 4 mm Allen key. Make sure the cutting head is perfectly perpendicular to the x axis gantry. Slight tilt or slant will result huge differences in cut quality.
19. Re install the abrasive hose and touch off tool
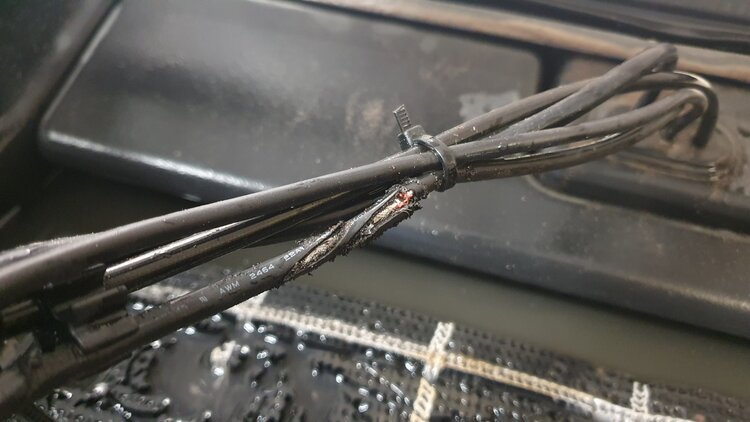
As a final check, it is important to pay attention to the Whip orientation. The “Whip” is the bundle of wires and hoses inside the tank. Please check if the Whip always curls up when the nozzle travels to the rear of the tank. Essentially, we want the Whip to stay orientated in an upwards fashion in every direction the nozzle moves. The Whip Caretaking Article can be found here!
Please take note that after the cutting head is worked on, the Whip can become oriented in a way that is prone to damage via the high pressure water stream. If any of the 4 wires/hoses become damaged, it will render the WAZER inoperable until component replacement. In some cases, it can severely damage the gantry system which will require a Main Unit replacement! Please pay attention to the Whip orientation regularly, and after the cutting head is worked on.
If you are concerned about your cutting head or the condition of the Whip, please contact the WAZER Support Team!
Next Time
Try to wash down the Z knob before using and also pay attention if you see the z- bellows pulling up push them back down before abrasive can enter the system