Custom Gasket Making with CNC Waterjet:
CPU Water Cooling Block
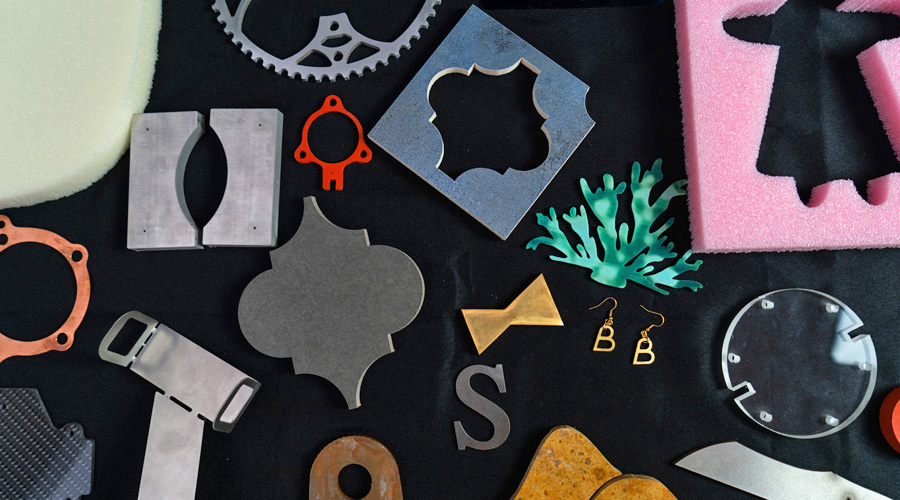
Gasket creation has been something that baffled us at WAZER for a long time. The soft, flexible nature of rubber-like materials make them prone to shift, fold, and flap during the cutting process. This leads to poor edge quality and even worse dimensional stability. We knew that we could accurately cut gaskets if we just took the time to figure it out.
In order to demonstrate the capabilities of WAZER in custom gasket manufacturing I designed a CPU Water Cooler Block, which used two gaskets of different thicknesses to seal the layers of the device.
The gaskets we created demonstrate that high quality and high complexity gaskets can be manufactured using the WAZER. These gaskets properly sealed the water cooling block from leaks in an area where a leak could short-circuit hundreds of dollars worth of computer hardware. We feel confident that using the information found in this article anyone can create exceptional custom gaskets for many applications.

Cutting Soft, Flexible Materials Accurately
Rubber is a very difficult material to work with when you are looking for high tolerances, sweeping curves, or precise cavity locations. The gaskets shown in the project would be impossible to create with hand tools, so the primary alternative to waterjet cutting is to machine a custom gasket die out of metal, which is expensive and overkill for low-volume applications.
Everything used in this product except the four fastening screws were cut with WAZER. Each gasket cut took only 10 minutes. The copper and stainless steel pieces each took 20 minutes to cut, and the acrylic cover took 15 minutes to cut.
In order to achieve the excellent edge quality and dimensional stability of the rubber gaskets shown in this project there are three preparation steps that should be followed.
Waterjet Cutting Rubber Gasket Techniques
The first step is adjusting the cut rate for your rubber gasket that is generated in WAM. The faster the nozzle traverses the rubber work piece the worse the edge quality of the gasket becomes. As a result it is advisable to have a cutting feed rate of less than 3 in/min (76.2 mm/min), or equivalent to the standard file for 1/16″ 6061 Aluminum. This reduced speed allows the jet to evenly cut the rubber as well as offers enough time for the jet to cut through the sacrificial backing material, which will be discussed next.
Second, you must prepare the rubber stock for cutting by attaching a sacrificial backing material to the underside of the rubber. This backing material gives the rubber rigidity in order to resist folding, flapping, or shifting during the cutting process as a result of water backflow. This material needs to be thin enough or soft enough so that the water jet can cut through both the rubber and the backing material. In this project I used a 0.012″ thick adhesive Polyethylene sheet for the thicker 1/8″ thick lower gasket. I then used a 1/16″ thick non-adhesive Delrin (acetal) sheet as the backing for the 1/64″ thick upper gasket. For exceedingly thin material, such as the 1/64″ upper gasket, an additional sacrificial top sheet can be used to further improve work piece stability. I used the 0.012″ adhesive Polyethylene sheet for this role.

Third, correct fastening of the work piece to the Cut Bed is paramount for success. I recommend a minimum of three fasteners on the outside of the gasket shape, and then at least one fastener on the inside of the gasket. This internal fastener should be in the negative (scrap) space created during the cut but should not be in the way of the Nozzle. This fastener serves to hold this scrap piece in place during the cut to prevent it from potentially interfering with the rest of the cut.

Soldering a 3D Heatsink From Thin Copper Sheet Material
All the pieces of the copper heatsink were cut from a 3/16″ copper sheet using the WAZER. To bond the fins to the base plate I first cut a steel locating jig that would connect to the bolt pattern of the copper base plate. The jig had slots for each of the fins to fit inside so that they would not shift during heating. With the bracket secured and the channels in place, I used a MAP-PRO torch and solder paste to join the pieces together and a Dremel to remove the excess solder between the channels.

The acrylic top plate was also cut using WAZER. The two central 1/4″ BSPT holes were cut using WAZER whereas the four M3 holes around the outside were only located using the WAZER and then drilled out using a drill press. I used a simple hand tap to cut the threads into the acrylic.

Custom Gasket Making for Any Application
Determining the process to create highly accurate gaskets using WAZER will allow people to create custom gaskets for many applications. Automotive, hydraulic, and pneumatic systems all require gaskets to prevent leaks, so the capability to recreate any gasket in these systems is a huge advantage.