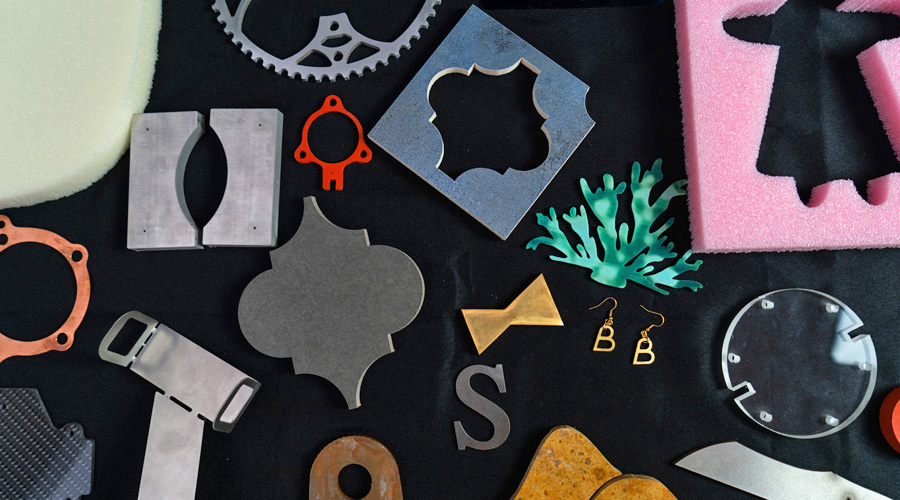
Fixturing For CNC Waterjet Cutting On Pre-Existing Parts: Smiling Cutlery
Customizing My Cutlery
In my case, I want to put some fun in my eating experience by customizing my forks, spoons, and knives. But I have a lot of them, and I want them to have identical smiley faces in an exact location. But how can I tell the WAZER exactly where I want it to cut? How do I keep my cutlery in place so it doesn’t dance around? When you are trying to cut a certain design into some objects that you want to customize, you want this process to be as quick and repeatable as possible.
Using WAZER For Repeated Cuts
The core challenge for me was to develop a fixturing method so that I could CNC waterjet cut all my cutlery exactly the same way. You know that the WAZER can cut your designs, but it isn’t exactly clear at first how to locate a cut at the same place repeatedly. What’s advantageous of having a WAZER is that you can manipulate its WAM to make the machine locate your part for you after some initial steps. Also, what if you want to start cutting at the same position after changing the cutting bed or when you are cutting the next day? So, after some trial and error, I found a technique that’s consistent for every time you want to cut a design. Here’s a step-through on how to create a system of locating your designs accurately on your fixtures to get the right cut at the right place.

Precisely Locating Cut Files Onto Your Material Stock Using Jigs
Here’s the first obstacle I encountered: how do I always know where my starting origin is for certain? Can I create a visual cue for myself to see the origin? In order to resolve this problem, you want to create your origin, different from the one the WAZER always starts off with so you know for sure where your cut is referencing to. Here’s what I did:
Create gcode for and cut a square from a metal sheet with substantial length (ex. 2’’ x 2’’). This square is going to be your relative origin which helps you align a corner of your fixture to a set distance from the (0,0) origin that the machine defaults in. Do not move the square from where it is fastened on the cut bed. Instead, bolt down the outer edges of the square.


Using the same gcode file you generated to create the cut square above, offset the origin in the firmware to a set point (ex. 20mm,-20mm) and cut again to create a little corner pierce for your fixture. Remember this offset. Do not move the corner from where it is fastened on the cut bed.
This offset is now your new origin you reference your fixture and design cut to. Essentially you are creating a new universal point of origin.
Fixing your Fixture and Design
Here’s the fun part: be your inner artist and design what you want, and think practically how you want to secure these utensils. Based on the object you want to cut into, design a fixture dxf file and make it so that it will hold your parts in place.
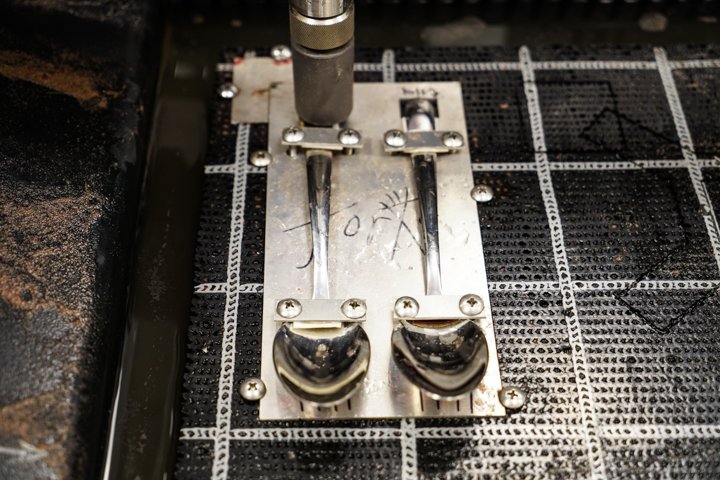
Consider these points. The universal point material thickness should be thinner than the material of the template to avoid hitting the cutting head. In my fixture, I laid the utensils on a flat surface to see the specific contact points the fork or spoon made with the surface. I then created divots in my fixture which then the utensil slipped in place when laying on the cut bed. I then put some clearance holes in my fixture to bolt down to the cutting bed the raised parts of the utensil to keep it in place on the cut bed. For my fixture, metal-to-metal contact between my utensils and the fixture might not allow for traction and immobility while the WAZER is cutting through the material. So using silicone sheets to cushion and gasket these contact points were beneficial to my fixturing experience.

With the same dxf file you used to create your fixture that you cut in WAZER, make a copy of it, and use your CAD software to create a design that you plan to cut into your part. Based on the dimensions of your design with respect to the fixture, jot this information down for the later step involving WAM. This helps you to set the position of your design. Save this file.
Save a separate dxf of just your design by using a dxf editor to get rid of just the template sketch in your dxf. Only your design you want to cut should remain.

Double WHAMmy
This is the crux of the solution. Open WAM, and first insert a dxf of your fixture that contains the outline of your template and your design. In the Scale and Position menu, offset your fixture template to the exact displacement you recorded when you offset your origin square.
With the dxf of the fixture, click the cutting path and select no cut. This will trick your WAZER machine to think that the origin starts right where your offset is, in this case, the top left corner of your fixture. For instance, when I started my cut file for my design cut, the cutting head first homed and moved to (0,0) then automatically moved to the new offset origin at (20mm,20mm).


Import another file that contains your dxf of just the design with the fixture sketch removed, and using the scale and position tab, place your designs where you would like the WAZER to cut. I used the dimensions recorded of my smiley design with respect to the fixture to help place the design in the relatively correct area first. The previous dxf you loaded in acts as an onion skin to help guide you in placing where your cut design should be located.
Then select how you want your cutting path to be for your logo design and generate your gcode file.


Last steps, then Smile
After all the initial setup mentioned before, this is the quickest and most convenient part that shows the efficiency of this method. Lineup your fixture where it should snugly fit into the corner you created in your square with the offset. Fasten down the fixture. Place in the part you want to cut. Fasten the fixture and your part. Run your gcode, and when setting the cutting head height, hover over the region of the part you want to cut and use the leveling cap tool to adjust the height as normal. Start the cut, and the WAZER should locate and cut your logo designs for you without another touch.

If you replaced your cut bed, or it’s been a few nights since you last cut your designs and cleared the cut bed, no worries. Just cut a new corner out of a new blank square using your original corner cut file. Then all your dxf files will still work without edits and you retain the same alignment between your fixture and the part you are cutting.