WAZER is an amazing tool for cutting thin materials such as sheet metal and shim stock.
But shim stock is thin and flimsy, requiring different cutting methods so that WAZER’s powerful waterjet does not distort or damage the delicate stock during cutting. This article and video show several techniques for successful waterjet cutting of thin shim stock.
PART 1 – Background on cutting thin Shim Stock and rigid Sheet Metal
WAZER can cut virtually any material, including thin shim stock. Regular rigid sheet metal can be cut in the WAZER using the normal method for setting up a cut. However, to cut thin shim stock, you should use one of the methods shown in the video above and explained below. With these methods, you can be confident cutting thin shim stock with a WAZER waterjet.
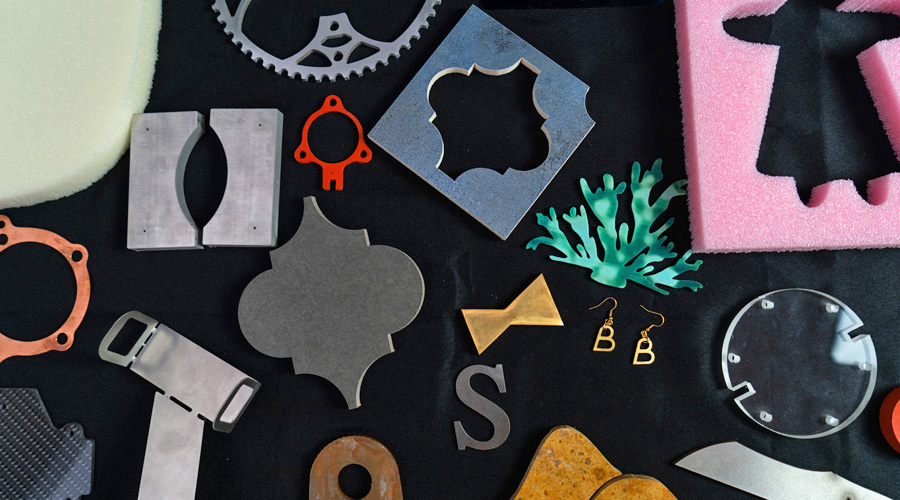
- As example, below are photos of pieces that were cut from shim stock on a WAZER – precise clean cuts, of copper and steel as thin as 0.002″
- Watch the video above for demonstrations of the three methods for waterjet cutting thin shim stock
- Read the article below to learn about the differences between waterjet cutting of rigid sheet metal versus shim stock, and for a step-by-step of the three techniques for waterjet cutting thin shim stock
Sample pieces cut from Shim Stock on a WAZER
Cutting Rigid Sheet Metal
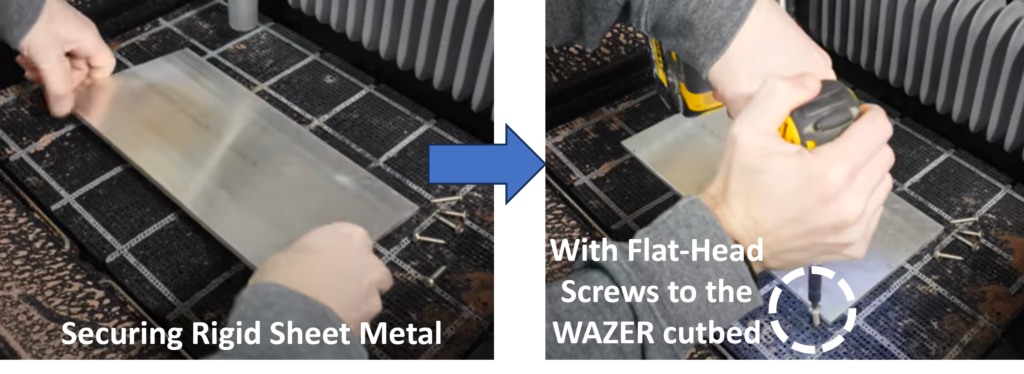
First, if your material is thick enough rigid sheet metal, typically 0.008″-0.010″ thick or more, then simply use the normal method for securing and cutting sheet metal in a WAZER:
- Place the sheet metal on the WAZER cut bed
- Affix the material with flat-head screws around its perimeter to secure the sheet for cutting
- Complete your cut and remove the cut part from the WAZER
If, however, your material is thinner than this, then you should use one of the various methods for cutting shim stock. Please read below, for 3 techniques for cutting shim stock on a WAZER waterjet.
PART 2 – How to get quality cuts with Thin Shim Stock, using a WAZER
Cutting Shim Stock
Shim stock is thinner and more flimsy than rigid sheet metal. It is too thin and papery to stay flat on the WAZER cutbed with just flat-head screws around its perimeter. Instead of a clean accurate cut, the waterjet will bounce and distort your material, as shown in these photos. The rest of this article explains three methods for cutting shim stock in the WAZER.
Three techniques for cutting shim stock on a WAZER:
| 1. Sandwiching | Use this method for one-off jobs, prototyping, or quick projects |
| 2. Stacking | Use for multiple copies of the same part, or low-volume production |
| 3. Fixturing | Ideal for cutting the same shape repeatedly, or if your design is complex with sections that might tear |
Method 1: SANDWICHING
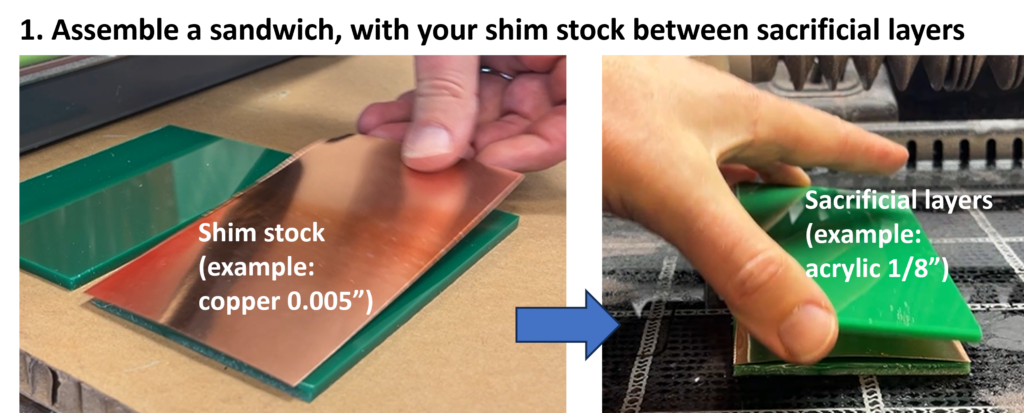
The first method works for one-off jobs and prototyping. This method sandwiches shim stock between sacrificial layers of other material. The sacrificial layers can be ⅛” acrylic, which is rigid, low-cost, and will not hurt cutting accuracy.
- Assemble your shim stock between upper and lower “sandwich” layers, such as 1/8″ acrylic sheet.
- These layers will hold the shim stock in place. Discard them after the cut is complete.
- No need to use adhesive inside the sandwich
- (See photos below)
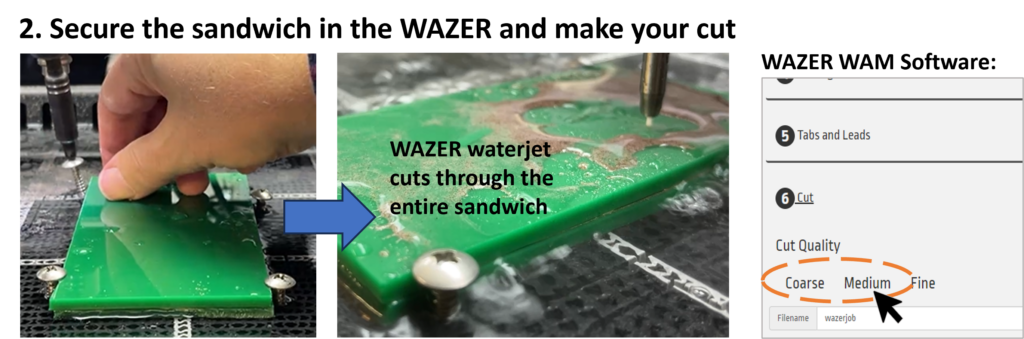
- Secure the sandwich to the WAZER cut bed with flat-head screws (as in the regular rigid sheet metal method)
- Make your cut
- (In WAZER’s WAM software, choose the medium or coarse setting. This will increase the cut speed and reduce the chance of damage to your shim stock.)
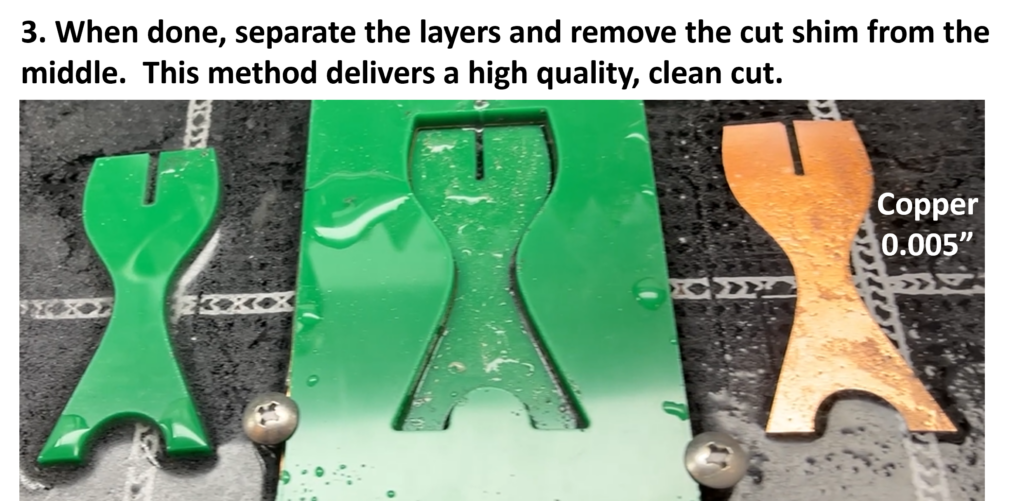
- When done, separate the layers. Discard the sacrificial top and bottom layers
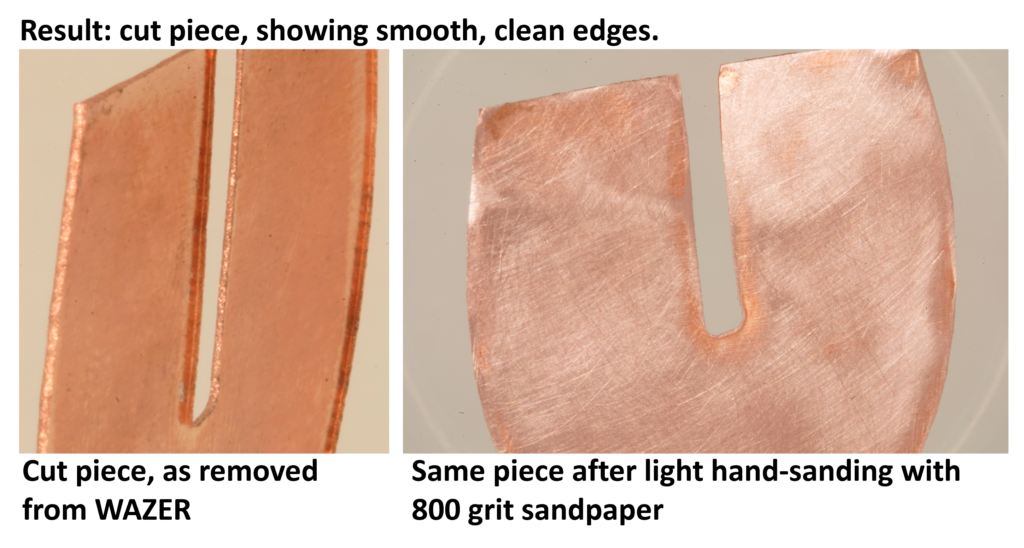
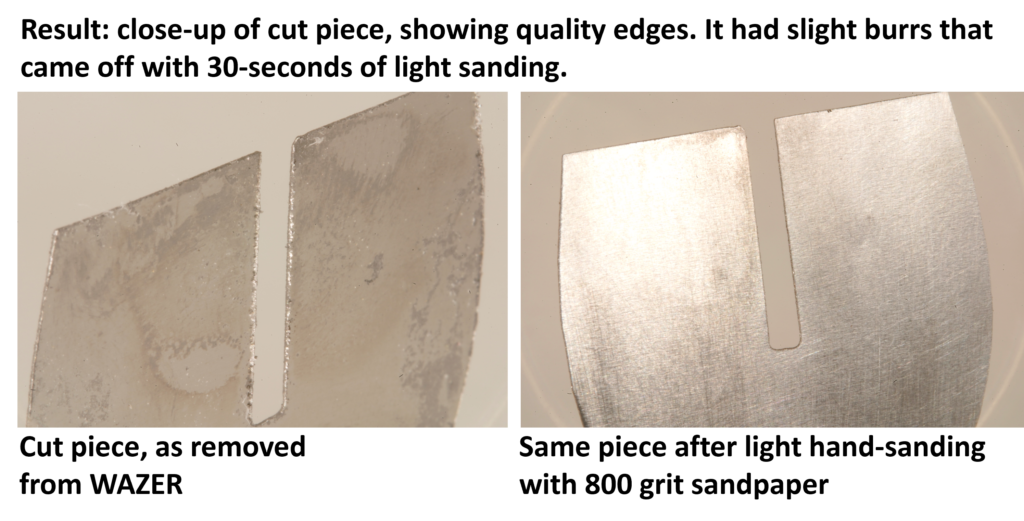
- As shown below, the quality of the cut part is good, but with slight edge burrs. Remove the burrs by hand-sanding for about 30-60 seconds with fine sandpaper (800 grit).
Outcome:
- Pros – this method is easy and effective, and yields good-quality cuts.
- Cons – adds time and expense for setting up the sandwich of sacrificial material. The sacrificial layers also slow down the WAZER cutting speed slightly.
Method 2: STACKING
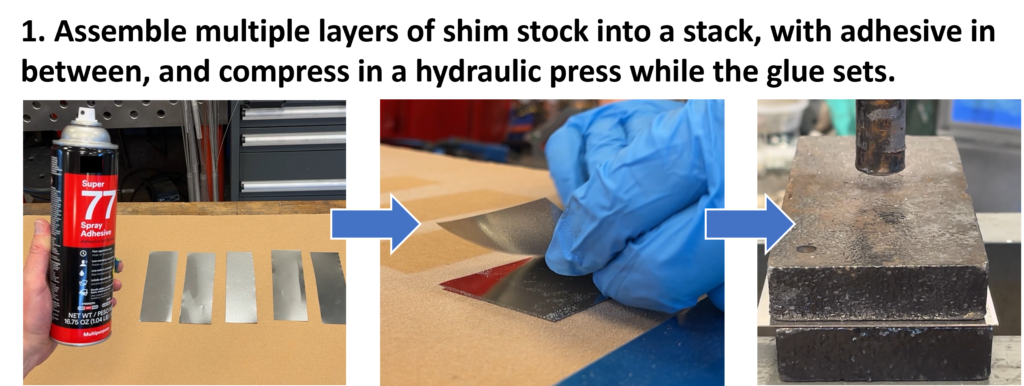
Method 2 is for multiple copies of the same part, or for low-volume production. This method stacks together multiple layers of shim stock into a thicker package, which the waterjet can cut without damaging the thin stock.
- Assemble multiple pieces of shim stock into a stack
- You can combine different thickness of shim stock by positioning the thinner layers on the inside, and stacking the thickest pieces on the top and bottom of the stack
- For best results, bond the layers with spray adhesive, and press them tightly (ideally with a hydraulic press) while the adhesive sets
- (See photos below)
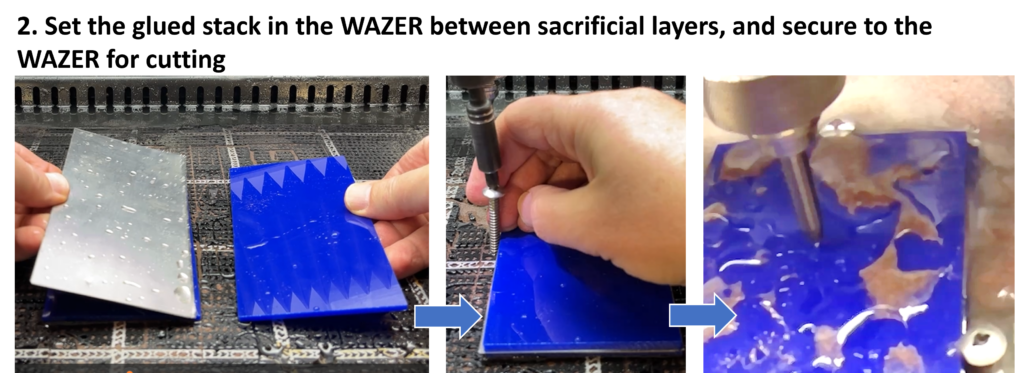
- Set the glued stack in the WAZER, with sacrificial layers on top and below for additional rigidity (similar to Method 1, above)
- Secure the glued stack and sacrificial layers to the WAZER cut bed with flat-head screws (as in the regular rigid sheet metal method)
- (Again, In WAZER’s WAM software, select the medium or coarse setting. This will increase the cut speed and reduce the chance of damage to your shim stock.)
- Make your cut
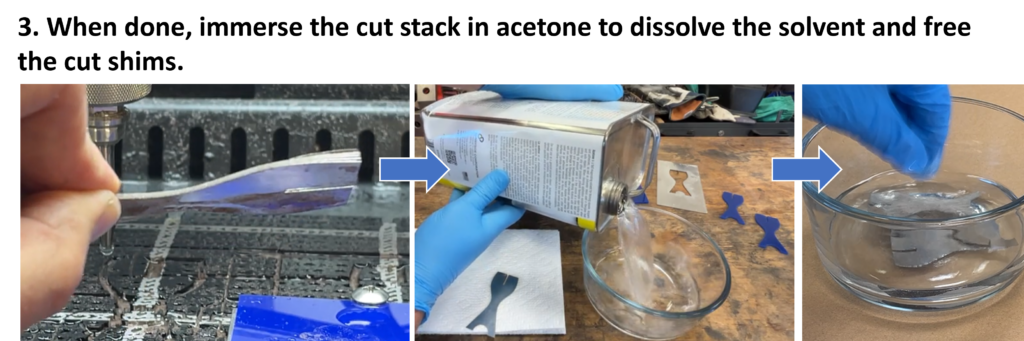
- When done, remove the finished cut stack from the WAZER and immerse it in a solvent (such as acetone) to loosen and separate the layers
- The part may also have slight edge burrs, which you can remove by hand-sanding for about 30-60 seconds with fine sandpaper (800 grit), as shown below.
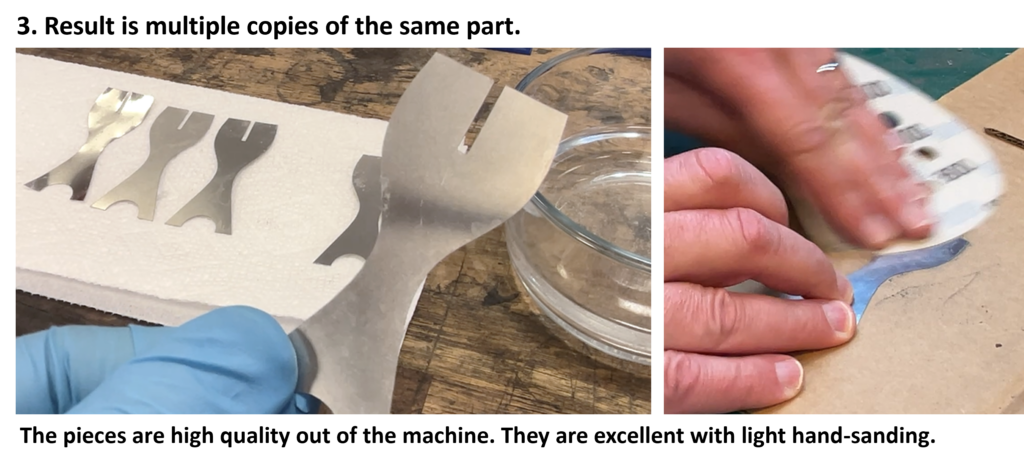
Outcome
- Pros – this method provides excellent quality cut parts with multiple copies of the part.
- Cons – it does require up-front and post-processing to separate the layers, and light hand-sanding.
Method 3: FIXTURING
Method 3 is for cutting the same shape repeatedly, or if your design is complex with fragile sections that might tear. This method uses a fixture to securely hold the shim stock.
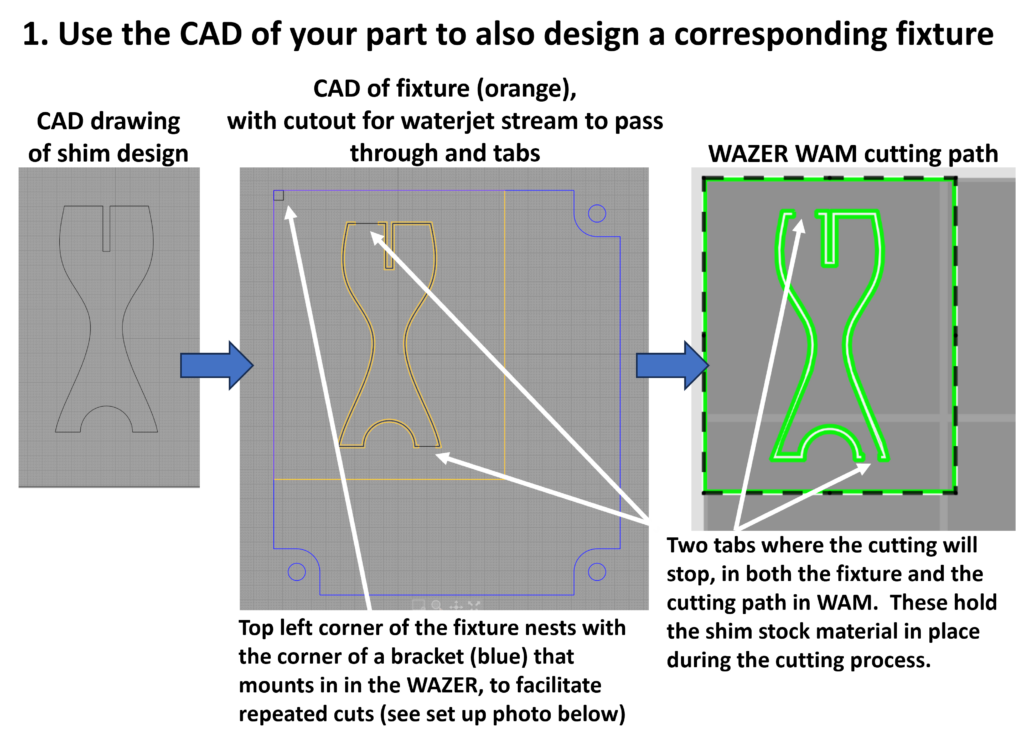
- Use the CAD of your part to also design a matching fixture (see photos below)
- Design the fixture with an open path that matches the cut part, for the waterjet stream to pass through
- In the fixture design, also include tabs where the waterjet will not cut. (These tabs will keep the shim material from moving during the cutting process.)
- In WAZER’s WAM software (which converts the CAD into WAZER cutting instructions) add matching tabs
- Use the WAZER to cut 2 copies of the fixture, to hold the shim stock during cutting
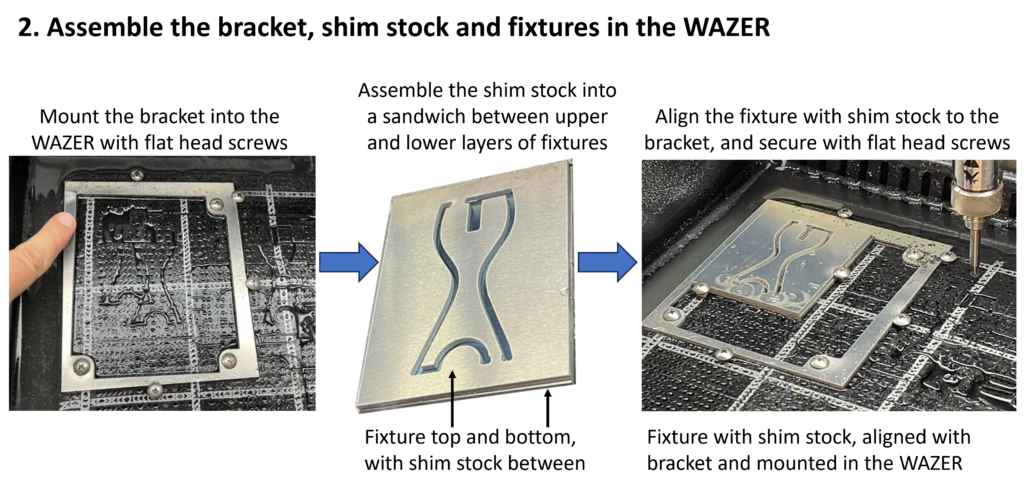
- Assemble the bracket, shim stock and fixtures in the WAZER
- Securely mount the bracket in the WAZER with flat-head screws
- Sandwich the shim stock between the two layers of fixture
- Mount the fixture/shim stock assembly inside the bracket with flat-head screws
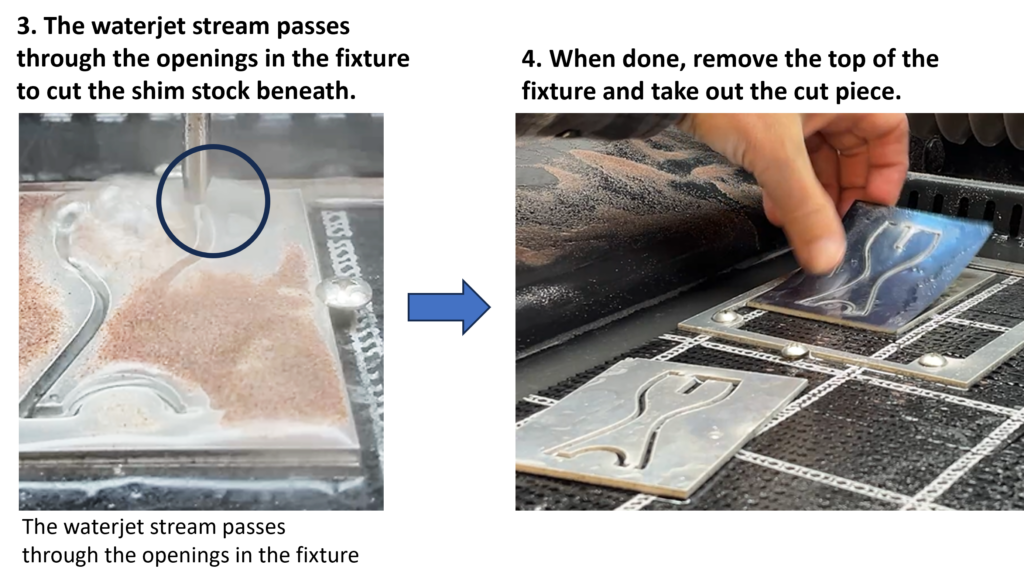
- While the fixture secures your shim stock, the waterjet stream passes through the open path in the fixture, to cut the shim stock beneath.
- (Again, in WAZER’s WAM software, use the medium or coarse setting. This will increase the cut speed and reduce the chance of damage to your shim stock.)
- When the cut is complete, remove the fixture and the cut shim. Then snip the tabs to release the cut piece.
- Similar to the other methods, this also delivers high quality outputs. The parts may have slight edge burrs which you can remove with light hand-sanding for about 30-60 seconds with fine sandpaper (800 grit).
Outcome
- Pros – this method gives excellent accuracy and repeatability. It also cuts fast because there are no sacrificial layers such as acrylic. If you need volume production, this method can be helpful.
- Cons – it does require up-front time to make the fixture, plus post processing to remove the tabs.

Summary
WAZER can cut precisely shim stock, making accurate, repeated parts. It can work with very thin material, multiple layers, and with shapes that have fragile, long extremities.
To achieve these results, select the appropriate method from these techniques, each of which is suitable for different applications, such as 1-off prototyping, cutting multiple copies of the same part, or getting high accuracy even with delicate shapes.
As with any project, you may need to invest some front-end time into preparing your material or preparing a fixture, however in return you will get quality cuts. You may also save significant time and expense compared to outsourcing or compromising on your part designs.