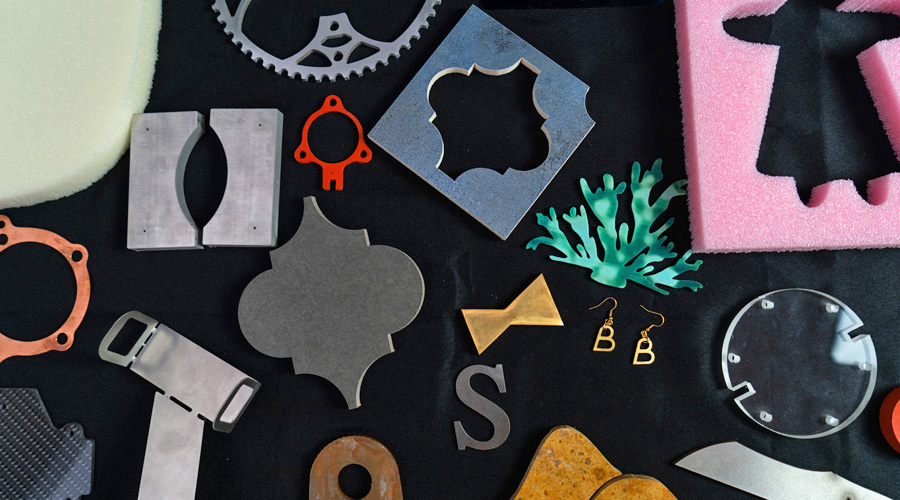
While a waterjet is an excellent cutting tool for flat stock, most people never consider it for 3-dimensional round items, such as hollow cylinders. Here in her own words, WAZER’s Athina Bellonia shares a technique for waterjet cutting cylindrical objects that yields great results on these hard to cut objects.
The Problem
I wanted to explore using the WAZER to accurately cut something other than flat sheets of material. To do this, I first needed to devise a method for attaching a round or cylindrical object to the cutting bed, and then create a method that would allow the waterjet to cut one side of the hollow cylinder without cutting through or damaging the opposite side.
The WAZER and waterjet cutting cylindrical objects
The WAZER is a very straightforward machine to use. Paired with its WAM software, cutting a design from almost any material has never been easier. However, I wanted to push WAZER’s limits by cutting non-planar surfaces. To do that required some creativity and thinking outside the box. After a lot of brainstorming and some trial and error, I developed a consistent way to cut intricate designs into glass bottles. This process can be applied to similar-shaped materials such as pipes and tubing, making waterjet cutting of hollow cylindrical objects easy.
Brainstorming and Test Process
Cutting cylindrical or non-flat surfaces on a waterjet was definitely something new for me. I had never thought of how I could use the WAZER to do that, so I had to come up with a plan to tackle two important issues when cutting hollow cylindrical surfaces. The first was how to secure the material in the WAZER cut bed while also keeping it beneath the waterjet cutting head, and the second was how to cut a design into the topmost surface and avoid the powerful abrasive water stream from reaching the bottom surface.
Effectively securing the object to be cut meant I had to firmly wedge a cylindrical item into the flat surface of the cut bed. Another issue is that the nozzle of the WAZER can only be adjusted approximately 1” away from the surface of the cut bed. My plan was to locate a used or damaged cut bed and use a handheld router to remove sufficient material to allow the cylindrical object to be sunk into the cut bed and be held firmly within the height restriction of the cutting head.
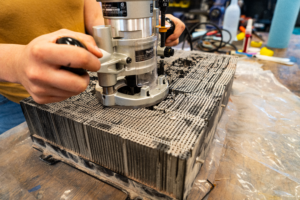
To dig into the cut bed, I used a handheld router to easily remove excess material and even the surface. Alternatively, a Dremel motor tool works equally as well to remove the material, but it might be a slightly slower, less accurate process. When routing out the excess material, you must be aware of the metal bars that run vertically on the cut bed.
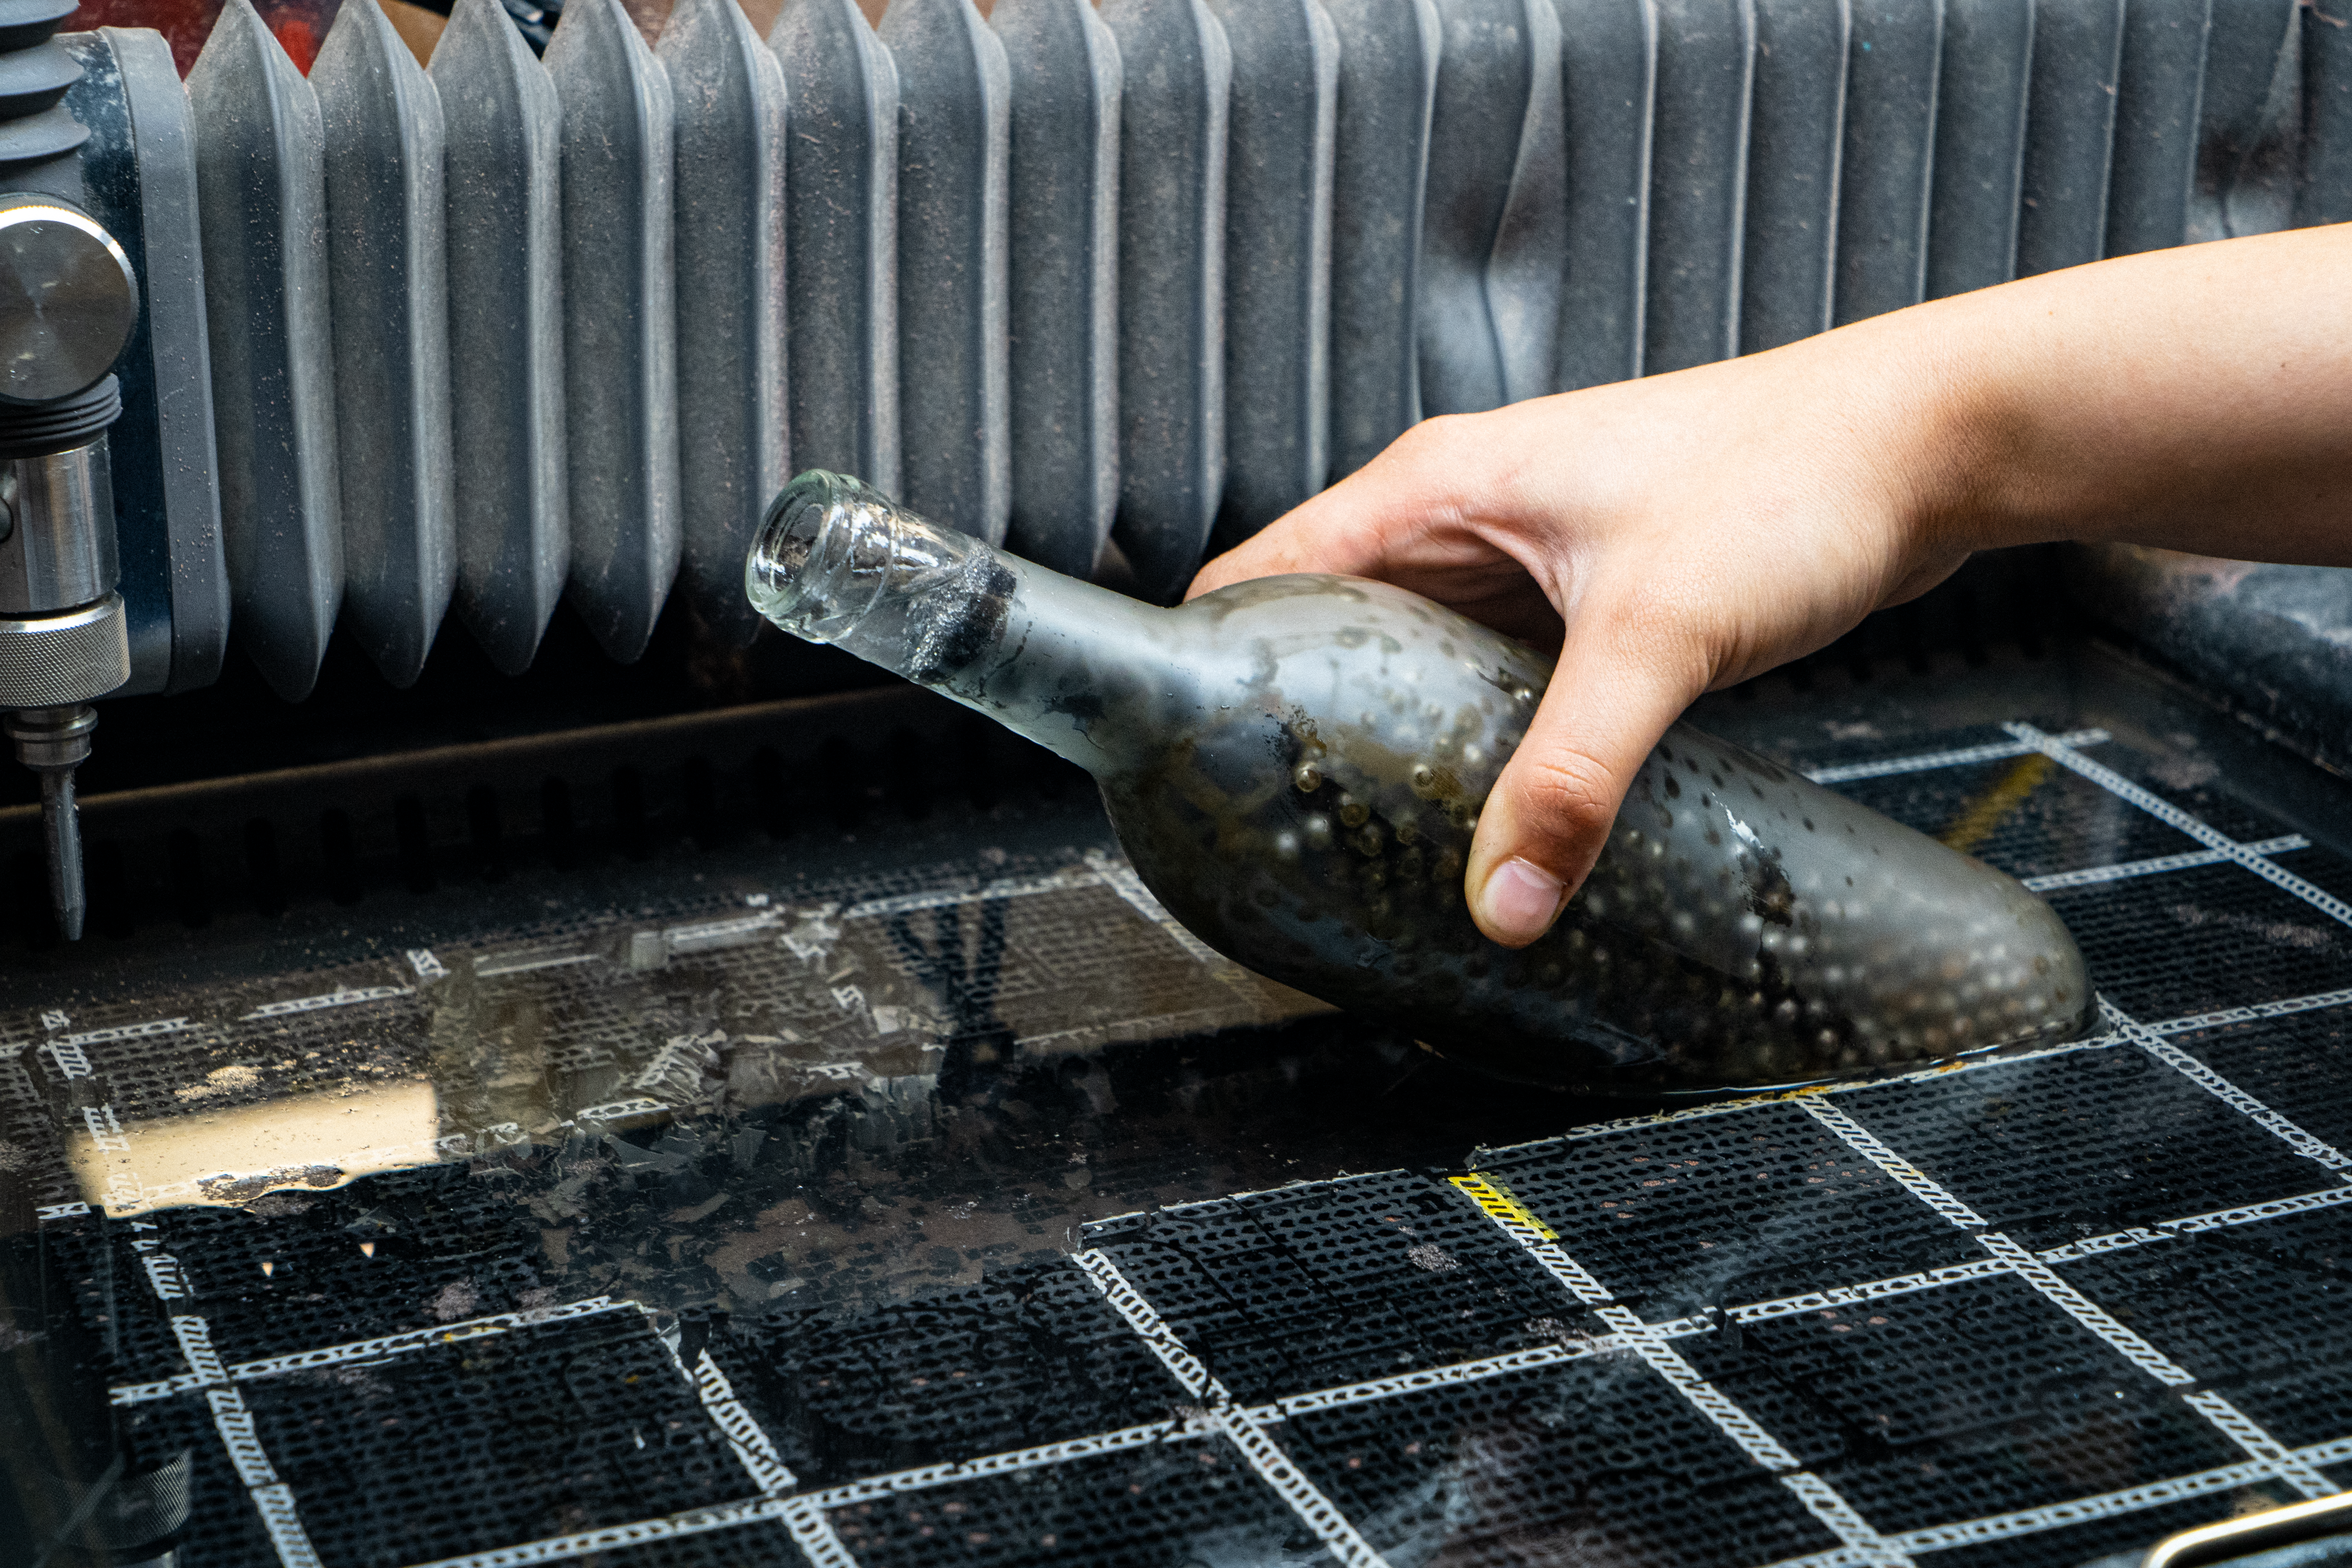
For my test cut on the WAZER I used a small glass bottle, so I didn’t need to remove a lot of material from the cut bed. My tests also determined that the maximum height the WAZER nozzle can be set is approx. 1.2 inches above the cut bed. Depending on the bottle diameter, the depth of the section of cut bed that needs to be removed will also vary.
With this first hurdle overcome, I moved on to determine how to stop the water jet stream from reaching through to the bottom surface of the bottle and damaging or cutting through it. The obvious answer was to use some sort of sacrificial material that could be inserted into the middle of the bottle. In my first experiment, I tested this idea by using a glass cutter to remove the bottom of the bottle, and then inserting a thick piece of PVC into the middle of the bottle. This was somewhat effective, but there were several issues with this process. First, it required you to cut the bottom from the bottle, which severely limited the usability of the end product. Second, and more importantly, the use of the PVC material caused the abrasive stream to bounce back and sandblast the interior surface of the bottle, causing damage and degrading the quality of the design’s cut edges. Given these significant negative issues, I needed to further explore if there was a better way of doing this. Ultimately, I determined there was a much better solution.
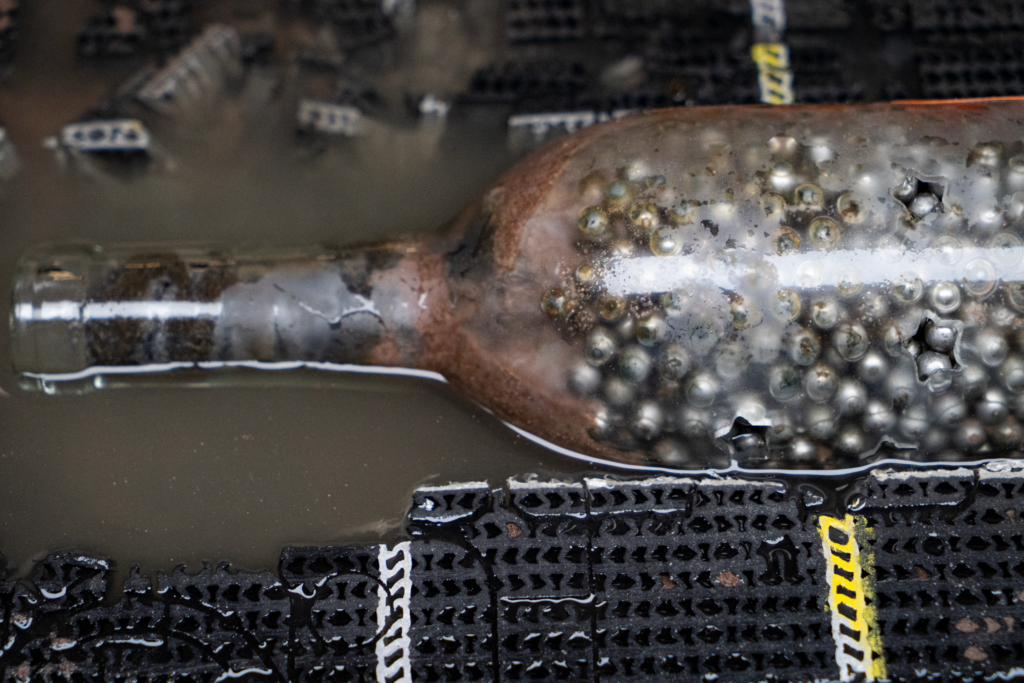
I can now confidently state the best way for waterjet cutting cylindrical objects is to fill the interior volume (of the bottle or cylinder) with small (approx. 5mm) stainless steel ball bearings. These small balls allow for a minimal gap between each other and they act as a mechanism to absorb the abrasive stream to the point where it does not distort or damage the inner surface of the cylinder (our sample bottle). Soft packing foam inserted through the top of the bottle keeps the ball bearings tightly packed and allows for the water to flow out, while still retaining the steel ball bearings.

Cutting, Composition, and Final Design
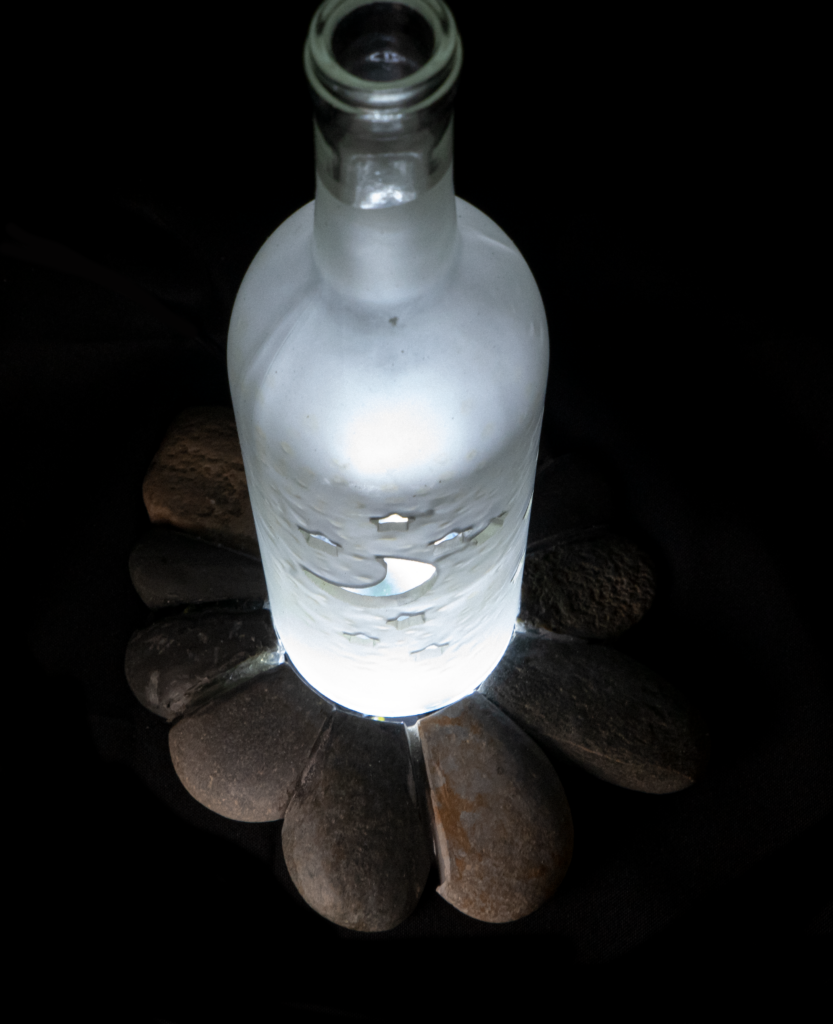
With the “how” settled, I turned my attention to the “what”, the actual design. I wanted to cut stars and a moon into the bottle and use LEDs to light up the bottom of the glass. I also wanted to incorporate a natural element such as rocks to create a base to hide the light and to create a larger base for extra stability.
The first part of cutting the design was preparing the cut bed. As mentioned before, I used a router to remove a sufficient amount of material so that the bottle fit snugly into the bed, with only a small portion remaining above the surface. I also made sure to note where on the cut bed the bottle was located to help me center the design in WAM.
The preparation in WAM was very straightforward. All I needed to do was import my design and make sure it was positioned correctly. I wanted to make sure that it would be centered on the diameter of the bottle. I was able to adjust its position vertically on the bottle by moving the origin point on the actual machine after the cut file was loaded and the bottle placed in the WAZER machine.
The next step was selecting the material and cut path. To make sure that the cut was clean with no odd lead-ins, I added very small tabs so that the lead-in would prevent small notches on the cutouts from the piercing. Choosing a “fine cut” will also make sure the cut is clean with a good edge. With the G-CODE set, I was ready to set up the WAZER for the cut.
Preparing the material is the next big step. For the glass bottle, I used a funnel to pour the stainless steel ball bearings into the bottle. I then used some packing foam stuffed in the neck of the bottle to keep the ball bearings tightly packed while still allowing waste water to escape. The bottle was then ready to be put into the machine. The WAZER cut bed had already been prepared, and the necessary cutout was available for the bottle to nestle in. After placing the bottle in the cutout, I made sure to check that the WAZER water jet nozzle had the necessary clearance from the bottle by moving the nozzle manually before prepping the machine for the cut.

Setting up the cut is again very straightforward. I cycled through the various WAZER menus until I reached the “cut” screen. Deciding where along the height of the bottle I wanted to cut the design, I used the Move Origin option on the WAZER to change the X position of my cut. Once the positioning of the design was good, I started the cut. Cutting through the glass bottle was fairly quick since the glass is not very thick. The bottle can be easily rotated to continue the design around the entire perimeter if desired.
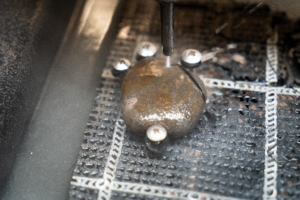
With the hardest part completed, the next step was to prepare and cut the pattern for the rock base. This was a very straightforward process since prepping the design on WAM was easy and all it required was putting in custom cut speeds and pierce times for the rock. When it came to setting up the cut, I simply secured the rock with screws and rubber washers. The washers were key because they readily conform to the rock surface and make sure it does not move during the cut.
Conclusion-Assembly
To tie everything together, I used epoxy to glue the rocks in the pattern that I wanted, making sure that the bottle would fit within the curved portion of each rock. I also quickly assembled a simple LED light that would shine through the bottom of the bottle. Finally, I assembled everything together and the result was a cool LED bedside lamp that I made myself using some very creative techniques. Waterjet cutting of hollow cylindrical objects can be easy and effective once you jump a few hurdles!