CNC Cutting Stone and Tile:
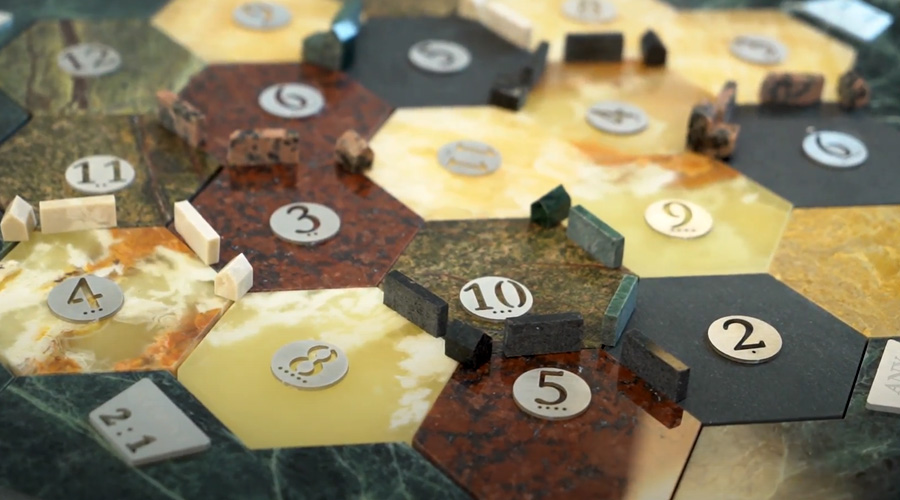
A Custom Settlers of Catan Board
I have played Settlers of Catan since I was a kid and always loved how the designs on the board corresponded to the various resources in the game. Recently I discovered a large number of DIY Catan set examples, and I thought it would be interesting to make one using the WAZER. To make this Catan set completely unique I decided to make the entire board out of stone, something I could only achieve with the WAZER.
With this idea in mind we laid out a few goals for the project. First was to showcase the capabilities of the WAZER at stone cutting. I wanted to show not only the ability to cut stone, but also the edge quality and accuracy of the pieces that would be made. My second goal was to demonstrate the edge quality one can expect when using the WAZER on metals.
Designing the Board Pieces
This project incorporated both stone and metal pieces to create a complete Settlers of Catan board. Using my own personal set as a guide and material online I was able to design each tile of the board and game pieces in Solidworks using exact dimensions. I used an assembly of the completed board to better determine the dimensions of the border pieces so that they could interlock correctly and offer enough space for the tiles contained within.
Choosing the Stone Types for Each Catan Resource
Material sourcing for this project required a diversity in stone hardness, consistency and colors to match the original board. To achieve this I sourced seven different stones for the board itself and four different stones for the board pieces. Each of these seven different stones was sourced as 3/8″ thick, 12″ by 12″ polished tiles.
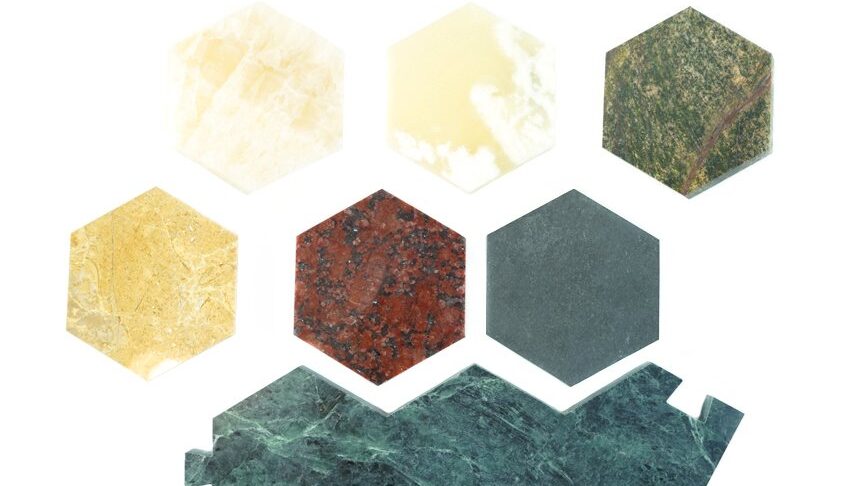
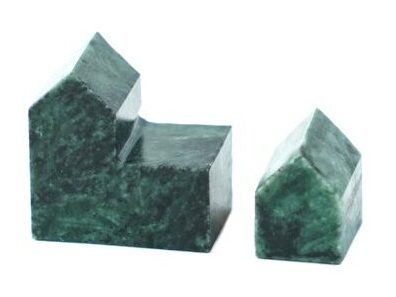
I cut the four sets of player pieces from stone as well. These stone materials were sourced as 1/2″ thick, 18″ by 18″ polished tiles. This variety in material allowed me to experiment with different cut techniques on the whole range of stone consistencies at two different thicknesses, as well as observe the differences in material hardness both between stones of the same class (ex. different marble samples) and within the stones themselves. The result of which we will share next.

Cutting Marble With a Waterjet
Marble in both 3/8″ and 1/2″ thick proved to be the easiest to cut of the four types of stone used. The light material difference and medium hardness in marble allows for a consistent, smooth cutting edge that holds sharp corners exceptionally well. This is a fantastic stone to introduce you to the capabilities of the WAZER on stone and requires very little pre or post processing to achieve a finished product. For feed rates on the machine I found that 0.5 in/min (12.5 mm/min) was the sweet spot for 3/8″ thick material; you could run your machine slower however I did not notice a significant enough improvement to edge quality to justify the slower cut time. For 1/2″ thick material I found that 0.3 in/min (7.5 mm/min) resulted in excellent edge quality and reduced kerf angle; you could run either slightly faster or slower than this speed depending on your tolerances for your product.]
Despite the relative ease of cutting marble there is one crucial step that must be taken prior to cutting, that is increasing the Lead In to more than 0.2″. This moves the pierce point on the material away from the desired cutting edge to prevent the erosion pocket from impacting the final product. Depending on the hardness of your marble the lead may need to be increased further or can be reduced. During my testing I found the largest radius of an erosion pocket to be 0.35″ for the softest marble but only a 0.05″ radius for the hardest marble.
The only post processing I did on marble was on the City and Settlement pieces cut from the two 1/2″ marble tiles. A light wet sand on 180 grit sandpaper and a single coat of clear varnish was enough to really make the pieces stand out. With this information in mind you can confidently cut any marble you can find and make intricate marble designs of your own.
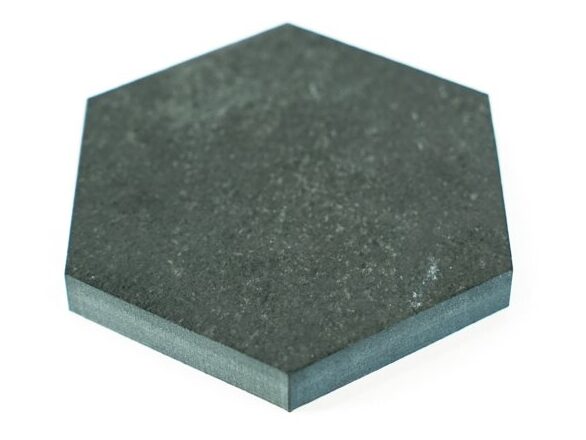
Cutting Slate With a Waterjet
Slate was the second easiest material to work with. Using the same feed rates as marble you can achieve incredibly smooth edge quality as well as superior corner retention. Leads can be adjusted on slate as you see fit since every slate is somewhat different, though I used a lead in of 0.2″ and never had an issue. Surprisingly, the layered material composition of slate did not impact the cutting, and I did not find any real issues caused by this material’s inherent nonhomogeneity. One final thing to note on slate is that the corners are delicate and will chip or crack more than your average stone, so just be careful with it.
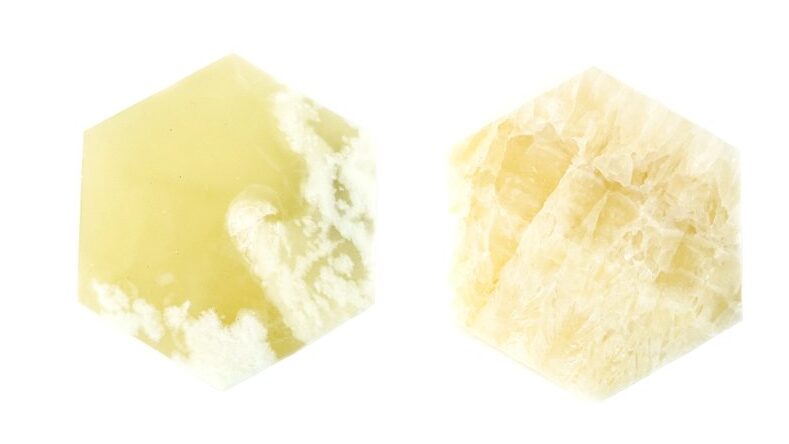
Cutting Onyx With a Waterjet
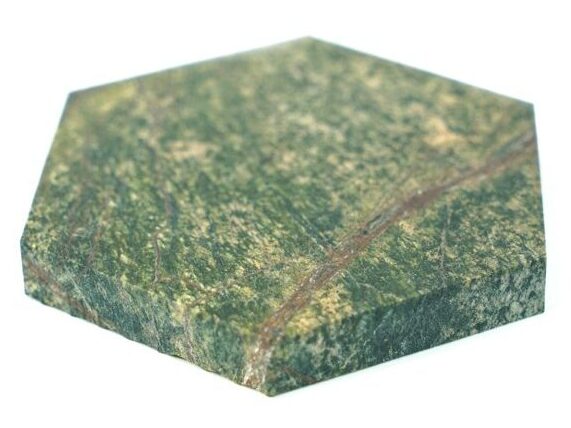
Onyx is a very fine grained type of quartz so this material is an example of a stone with almost completely uniform composition. The feed rates and lead-ins for marble also apply to onyx even though this material is significantly harder. Both onyx variants cut in this project demonstrated exceptional edge quality and accuracy, however both need some pre-processing to achieve accurate sharp corners. Due to the hardness of onyx the WAZER will occasionally leave small “tails” on sharp corners as where the water jet exits the material does not have enough time to catch up to the nozzle before it changes direction. To avoid this I manually changed the feed rates around the corners of each tile using the website: https://ncviewer.com. Once you have generated your Gcode file in WAM, open it using notebook and then copy and paste the actual text from the Gcode file over the text on the left side column in NC viewer. Once this is done click “PLOT” to view your project as the WAZER sees it. You can scroll through the lines of code to see where the nozzle is located on the workpiece as it cuts out your part. Right at each corner there should be an “F” command at the end of the line of code (ex. F7.50), this is what determines the speed of the nozzle for everything following that command. By changing the number following the “F” you can manually slow down the nozzle and achieve a sharper corner. I reduced the corner speed for the onyx tile from F8.75 to F6.75, and this was enough to eliminate the “tails” on the corners. In addition to the reduced corner speed it is important to eliminate any tabs left on the material when working with onyx. Even a very small tab can cause shattering of the part during removal, as shown below. If your cut stops for any reason I recommend you ensure that continuing the cut will not create a tab or restart the cut entirely. If you keep all of this in mind you will be able to easily create striking pieces from a truly elegant material.
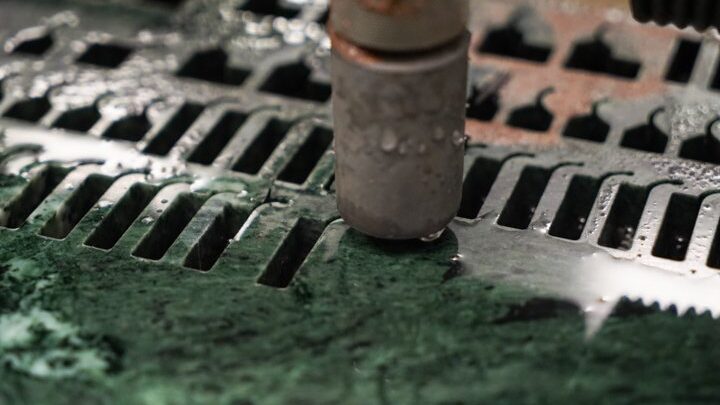
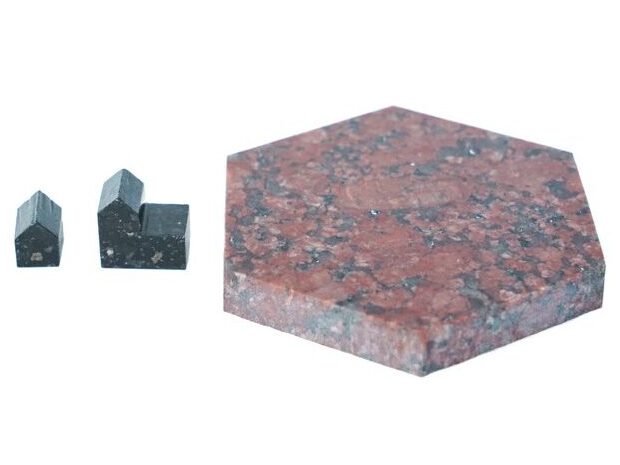
Cutting Granite With a Waterjet
Granite was the most difficult to cut. Granite is a very hard material and has a “chunky” consistency such that there is a large variety of very hard and less hard grains found within the material. This causes large problems for the water jet as the harder material will cut more slowly than their softer surroundings, which will cause the jet itself to curve around the chunk. This can lead to poor edge quality and accuracy as well as significant corner “tailing”. To mitigate this my solution was to adjust the feed rate to match the maximum speed at which we can cut the hardest part of the granite; essentially ignoring the softer parts and treating the granite as a uniform slab as hard as its hardest part. The feed rates I used for granite were 0.3 in/min (7.5mm/min) for the 3/8″ thick tiles and 0.2 in/min (5 mm/min) for the 1/2″ thick pieces. In addition to reducing the feed rate it was necessary to reduce the speed at the corners, using NC viewer, as well. I reduce the corner speed of the water jet from F5.00 to F2.00 for all granite cuts. Lead-ins for granite are also recommended to eliminate the chance of part loss due to pierce point related defects. I used a lead-in of 0.2″. With this fine-tuning I found it unnecessary to post-process any of the 3/8″ thick tiles, however the 1/2″ thick City and Settlement pieces needed a good amount of sanding. I wet sanded each of the pieces on 120 grit sandpaper to remove any striations on the cut surface as best I could. I then clear coated each of the pieces to give them a gloss finish. Granite does require a lot of pre and post processing and is very slow to cut with WAZER, however with this information I know that you two can create striking granite pieces for anything you can imagine!
Sheet Metal Cutting With a Waterjet
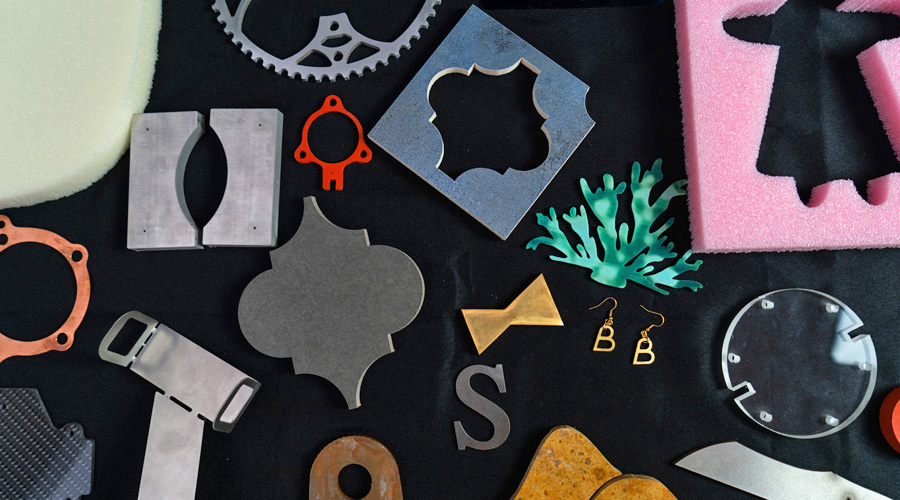
The number and port tokens were cut out of a 1.5mm sheet of 6061 Aluminum using the standard WAZER feed rates, lead-ins, and tab widths. The one exception to this was in the offset spacing of the cutting path. I reduced the offset to be 0.005″ in order to more accurately achieve the detail desired on the numbers themselves. Aluminum is one of the simplest materials to cut with the WAZER, which is why the complete set of tokens were made with Aluminum. However, to showcase the edge quality of the average cut on the WAZER for metal of different hardness and ductility I made the sample set shown below.
Finishing Techniques for Waterjet-cut Sheet Metal
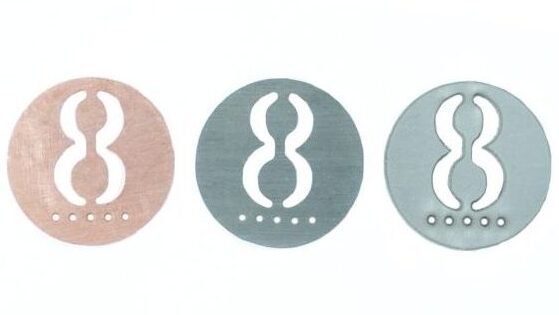
Aluminum is very easy to process into a finished product. I simply wet sanded the tokens with 120 grit sandpaper to remove all burrs and patina from the token surface. The result was a clean brushed look that fit in well amongst the stone tiles. For the actual Catan set, I laser engraved the letters on the back of each token.

Stainless steel is a harder material and will take significantly longer to cut than aluminum. However this hardness reduces the size of the burr. The easiest way to remove the exterior burrs on stainless steel is with a deburring tool. For the burrs on the more intricate internal curves I again wet sanded the piece using 120 grit sandpaper. Though the sanding may take a little longer the result is just as good as the aluminum token.
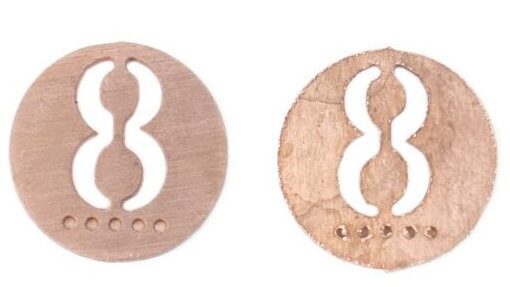
Copper is the softest metal of these three and therefore has the largest amount of burring. Luckily, copper is so soft that you can remove many of the burrs with just your finger nail, though a deburring tool works well too so long as you are careful not to remove too much material. Wet sanding is quick and easy on copper and the 120 grit left a fantastic brushed finish on this token.
A Beautiful Settlers of Catan Board
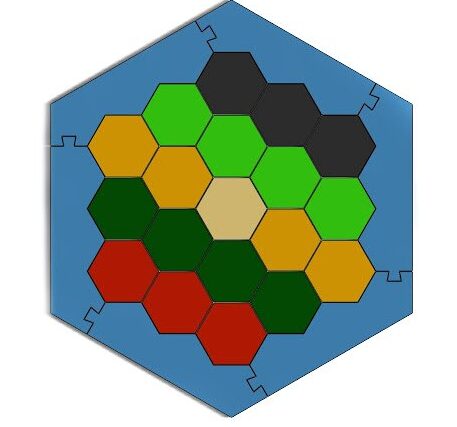
The final result was a 100% playable Settlers of Catan set. All you need is a deck of resource and development cards and a set of dice and you are ready to go. I am very pleased with the final product and thankful that it all came together. The border pieces interlock perfectly and encompass the board well. The player pieces also came out phenomenally well; the edges are very clean and match the original pieces almost exactly.
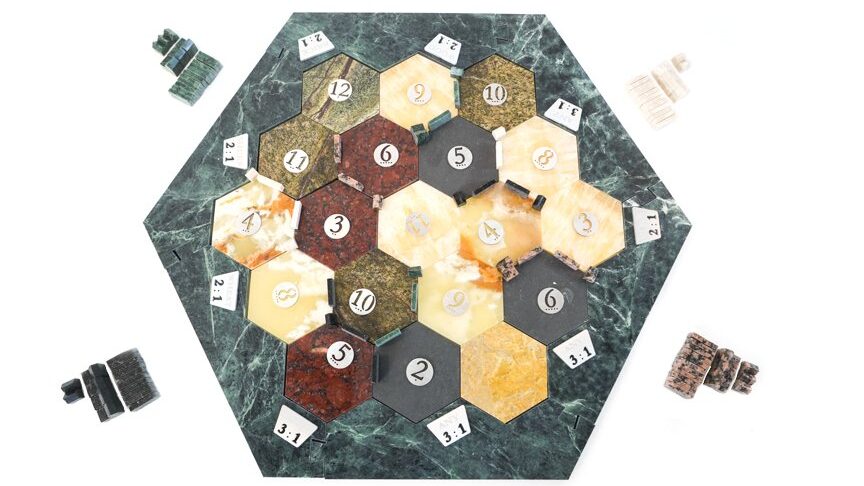
My favorite part of the final board is how the natural coloration of each tile corresponds with the resources they represent. This is most notable in the forest tiles and ocean border. The rainforest marble is named exceptionally well as that is exactly what this stone looks like – a birds eye view of the rainforest. In the ocean border the empress green marble’s white veins and deep greenish-blue background give the appearance of a storming sea. This is truly a unique Catan set and possibly the first set ever made out of stone!