The WAZER has modest infrastructure needs: beyond electricity, it requires only a water feed in, and a drain for waste water going out. This article contains a short video, as well as details and solutions to help improve both your input water and output drain.
PART 1 – Water Input Going Into the WAZER
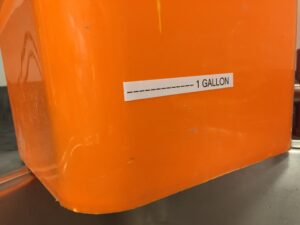
WAZER requires an input flow rate of 1 gallon per minute (gpm) @ 35 psi.
This is usually met by most municipal water supplies, so if your water input comes from your city or town municipal system, there’s a good chance that your water input is perfect for WAZER. (PSI is pounds per square inch, the standard metric of water pressure.)
Testing your Input Water Flow and Pressure
If you’re not sure of your input water flow or pressure, it’s very easy to test: just fill a bucket of water for 1 minute. Then measure how much water is in the bucket. If the bucket contains over 1 gallon, then your input water flow is sufficient. Plus, since there is a direct correlation between flow rate and the water pressure, if the bucket had at least 1 gallon, you can also be comfortable that you meet the 35 psi requirement.
Improving your Input Water Pressure, if Needed
However, if your bucket did not fill to at least 1 gallon, then you need to increase the water flow and pressure that goes into the WAZER.
Good news: this is easy to do. Simply install an outboard pump to increase the flow rate to an acceptable level. These pumps are inexpensive and readily available online. Be sure to select a pump that delivers at least 1 GPM and 35 PSI, as shown below.
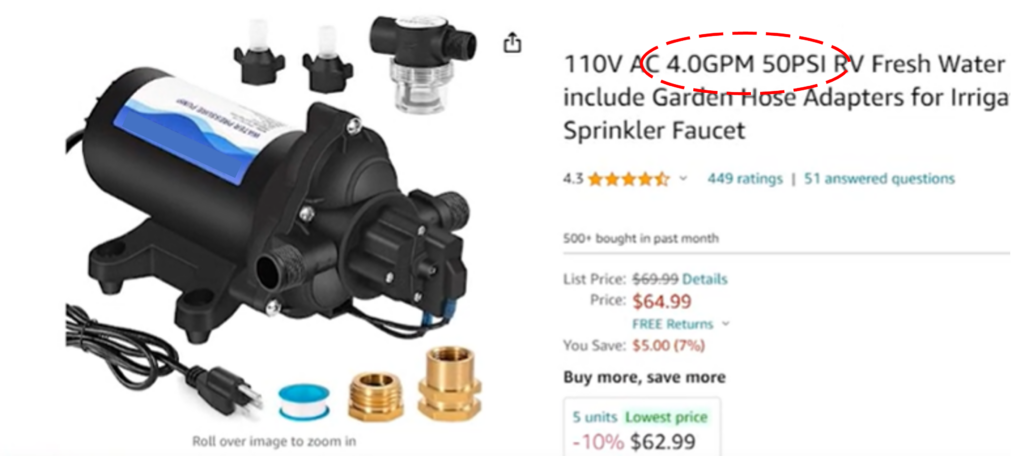
Outboard Pump Installation
These pumps are easy to install – they run off your standard 110v household line, and are installed between your water input line and the WAZER. Follow the installation instructions which come with the pump. In summary:
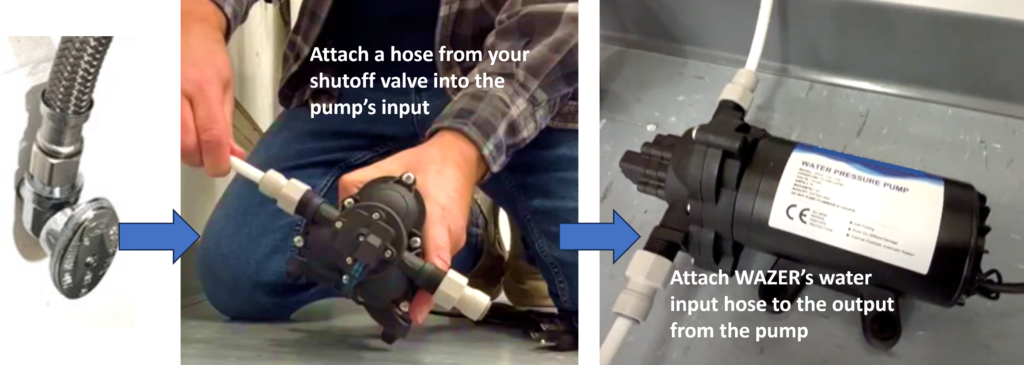
- Always remember to shut off your water first.
- Then attach your source water line from the shutoff valve into the pump’s input.
- The pump will include a number of fittings for different situations, to accommodate most plumbing lines.
- Last, attach the WAZER water input hose to the output from the pump.
Input Water Quality – Hard Water and Particulates
While generally not a factor in most cities, people in some rural areas or who use well water may experience sediment in their water, or “hard water.” Again, good news – the WAZER has a 30 mesh input filter that captures a significant amount of particulates that may be in your water. This is generally all that is needed for operation. However, hard water, or a high level of dissolved minerals could shorten the lifespan of the pump assembly, or damage other internal systems.
Testing your Input Water Supply for Sediments and Particulates
The WAZER needs input water with less than 180 ppm (parts per million) of particulate matter. Fortunately, it is easy to check the quality of your water with simple test kits that are inexpensive and readily available online (see below).
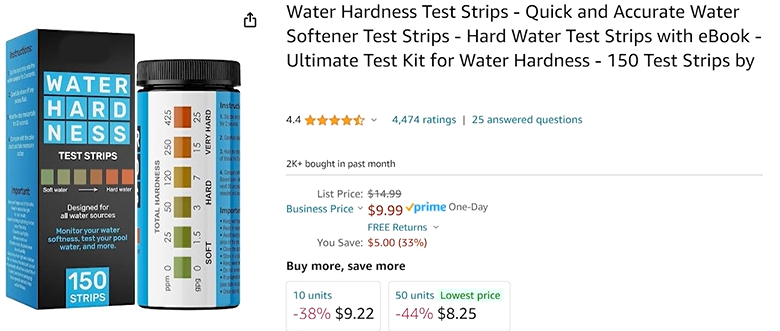
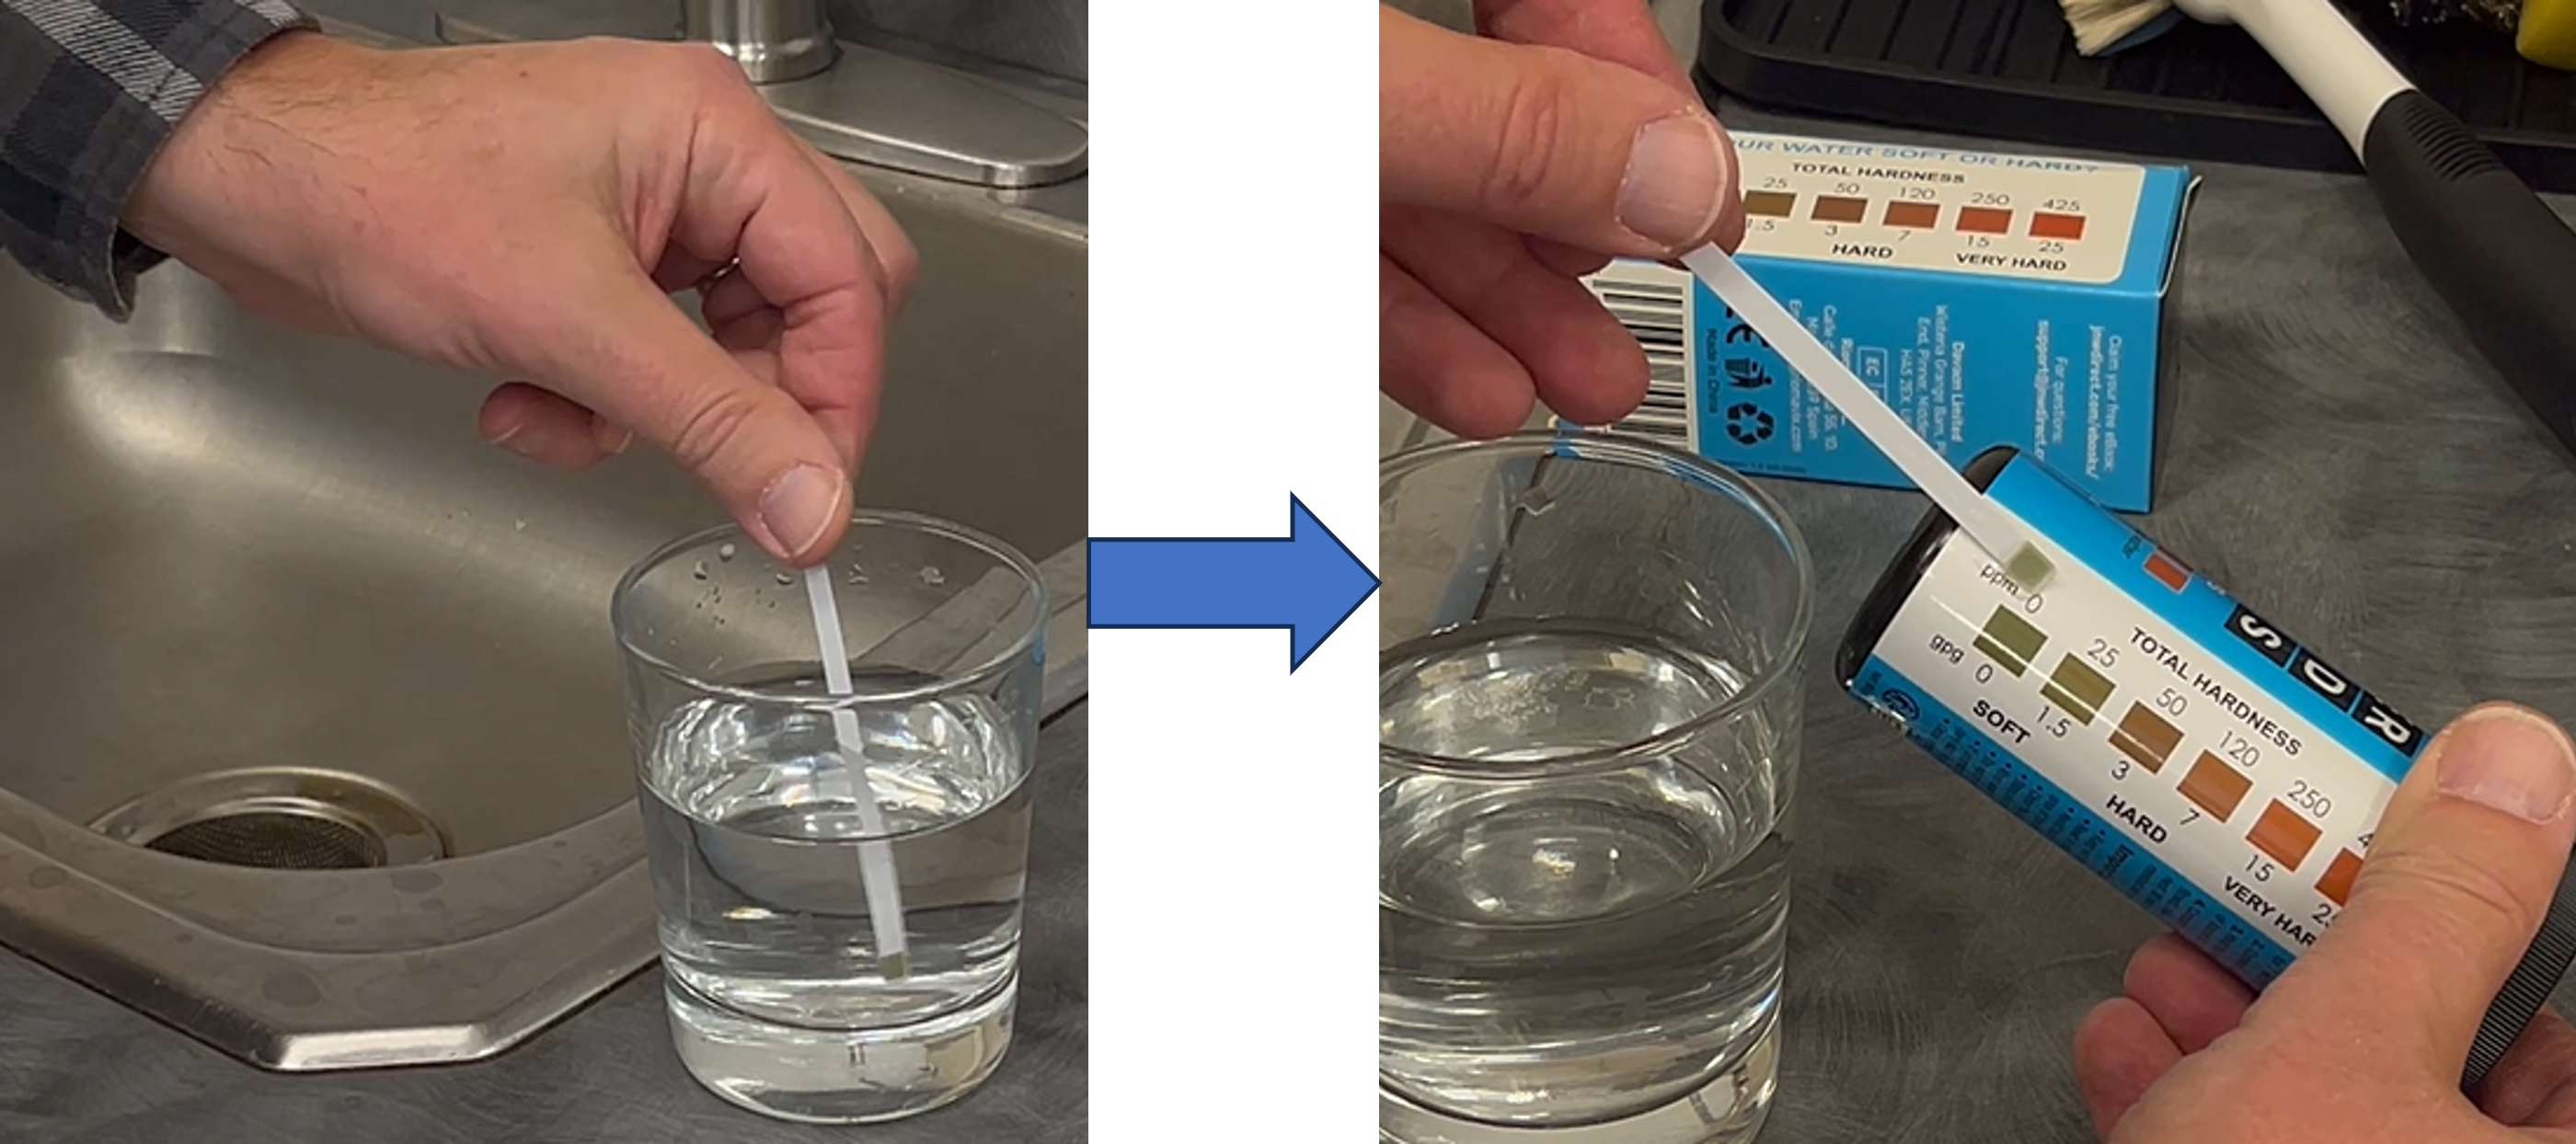
To test your input water quality, simply dip a test strip in your water, wait, and compare the results with the color-coded chart on the packaging (follow the instructions on the package). Check to be sure the water has no more than 180 PPM of particulates.
If your water has a TDS greater than 180 PPM, or if you have hard water, we recommend adding a reverse osmosis system to filter the water before it enters the WAZER. These filters are readily available online, as shown here.
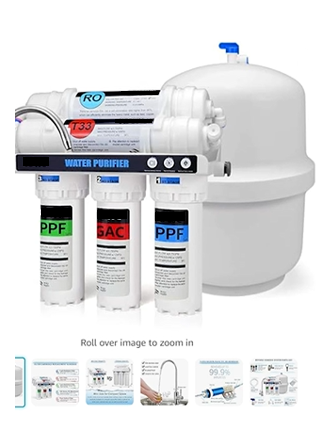
Installation of Reverse Osmosis Filter
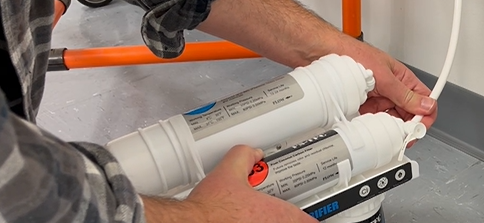
Installing a reverse osmosis water filter is similar to installing the outboard pump, described above. Follow the instructions with the unit.
- Remember to shut off your water first.
- Then attach the output from your water line into the filter system’s raw water input.
- The filter system will include a number of fittings for different situations, so installation can accommodate most plumbing lines.
- Last, attach the WAZER water input hose to the output from the filter system.
Please note that the reverse osmosis filter will likely reduce the input water pressure. The reverse osmosis filter approach works most effectively when the filter is used to fill a holding tank, which is then used to supply water to the WAZER. After installation of the reverse osmosis filter, confirm that the pressure and flow rate coming out of your filter system still meets WAZER’s spec of 1 gallon per minute (gpm) @ 35 psi. If the water presser is too low, you may need to add an outboard pump as described above. If you do, be sure to install the pump between the holding tank and your WAZER.
PART 2 – Drain Water Coming Out of the WAZER
Depending on your locale or facilities manager, you may need to know the amount of total dissolved solids exiting the WAZER machine and how it may compare with your municipal drain water standards. You will need to contact your municipal sewer authority to obtain their standards.
A test of WAZER’s output showed that WAZER produced 382 mg/l of TSS (total suspended solids), which is similar to the peak-level household drain output water. The documentation of this test is available in a 6-page analysis at wazer.com/tdsreport.
Collecting the Used Abrasive from the Drain Water
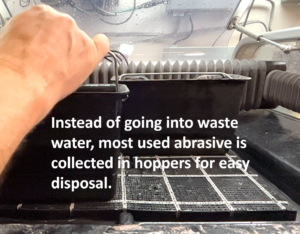
WAZER has an integrated system for collecting its used abrasive so that it does not reach the drain water.
- The WAZER collects 99% of the used abrasive inside the machine, so that it does not reach your waste water.
- The used abrasive is moved to a pair of collection hoppers at the front of the machine, or is collected at the bottom of the WAZER’s main tank.
- You remove the used abrasive by simply lifting out the hoppers and dumping the abrasive into the garbage. The abrasive that collects at the bottom of WAZER’s tank can be scooped out when you periodically clean the machine.
- Combined, these keep your drain water cleaner.
If you have a septic system, you may have concerns about the used abrasive from the WAZER clogging your septic system. As noted above, virtually all the used abrasive gets collected into the hoppers or collects in the WAZER main tank, instead of flowing into a septic tank.
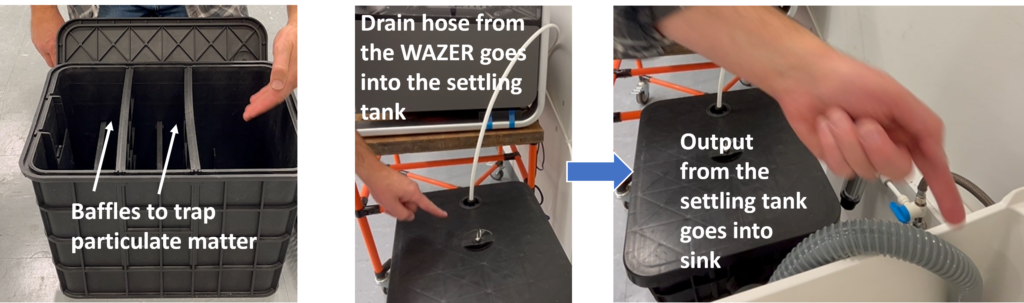
Adding a Settling Tank to further Purify the Drain Water
Some customers may wish to even further mitigate abrasive or debris from entering their drain water. If you wish to, we suggest adding a settling tank to your WAZER drainage system. Settling tanks are readily available, and remove almost all of the remaining material, making the drain water even cleaner.
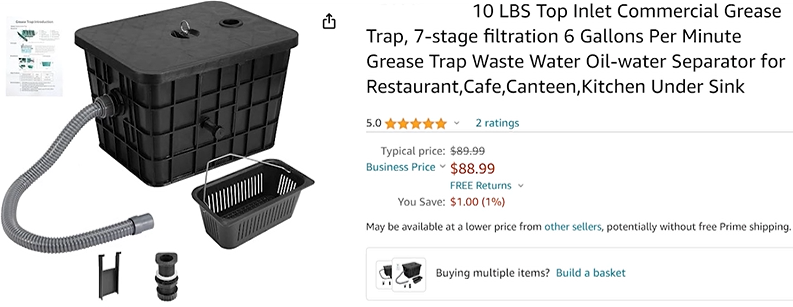
- Settling tanks have a series of baffles inside, which trap particulate matter, allowing it to settle at the bottom of the tank instead of flowing out.
- To add a settling tank, simply route the drain water hose from your WAZER into the settling tank input.
- And then route the output hose from the settling tank into your drain or sink.
- Locate the settling tank on a counter or shelf above the drain or sink, so that the water will flow down from the tank into the sink. (If your settling tank has a pump, it may be located below the sink.)
Summary
The WAZER needs input water and produces output waste water.
You can easily determine if your water supply meets the WAZER’s input requirements, and remedy the water pressure and/or water quality with readily available solutions.
The WAZER collects its used abrasive so that you can discard it, instead of letting it go down your drain. If needed, you can also supplement with a settling tank to further purify your output water before it enters your drain.